With Google Maps installed on your new iPad, you can find anything, anywhere. Here are some tips to help you use your iPad Google Maps more easily.
Get Started on Using Google Maps on your new iPad
- Tap on the Maps icon on your iPad home screen.
- Tap on the search section on the top of the map and type the address you are looking for, you can enter streets, post codes, zip codes, or places of interest.
- Hit the pin on the place you have searched, then you can gather more info on the area on your device.
- Zoom in and out to get the detailed info around the place, or tap the corner edge of the Google Map to switch to satellite mode.
- You can also hit directions to find the distance from the point you just pined.
Other options:
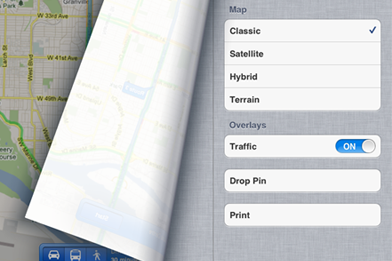
Classic: Google Maps' default is to give you a classic view showing you lot outlines, businesses, and other useful features.
Satellite: This mode presents you photographs which are taken by satellite.
Hybrid: This combines text showing you the street names, business names, transit stops and satellite photography.
Terrain: This is useful to find elevations, streets, parks and university campuses and more nearby for a walk.
Traffic: Using this, you can get major streets, highways, and freeways and more to help you to drive.

If you have upgraded your iPad to the new iOS system such as iOS 8 or iOS 9, you can use two more new features of the Google Map on new iPad:
- Use AirPrint on the iPad Google Maps and use it for offline data.
- Choose more than one route (also known as alternate route).
To Find Your Current Location and Showing the Compass.
Once you have found where you are, you can tap the compass icon in the status bar of the Google Maps at the top of the screen. A blue dot would be added to re-center the map on your current location
Tap on the blue dot, you will get a brief description of the place. You can tap on "i" in the brief description to get more detailed info about the location.


