


Mac users were impressed with the features that came with the Mac OS 10.12, also known as MacOS Sierra. Thy enjoyed optimized storage, auto unlock, enhanced Siri and a lot more. Now that Apple has released the MacOS 10.13, also known as MacOS High Sierra, many users are itching to get started with it. The High Sierra comes with a new Apple File System that makes your Mac operate faster than before, among many more great features. As with any new upgrade, there are issues that will crop up after installation and you will see some of the most common, and how they can be fixed.
Part 1: Installation Freezes or Gets Stuck
As may happen whenever you are trying to install an update, the MacOS High Sierra installation may get stuck of freeze. This can happen at any point during the installation process and can be very frustrating, especially if it gets stuck near the end after waiting for so long. This has made many users abandon the update and remain on the MacOS Sierra version. There are several ways in which you can rectify this and here are some of them.
- Before installation, enable Root User and then disable it again.
- Stop or uninstall any antivirus which may be blocking the installation.
- Reboot the computer into safe mode and then install High Sierra.
- Use Command+Option+R and install the update via Internet Recovery
Part 2: Data Lost on MacOS High Sierra
After upgrading to MacOS High Sierra, you may lose some crucial data and files. Recoverit (IS) for Mac is a wonderful tool that you can use to recover your lost data. It has an easy-to-use interface which will make the whole recovery process easy for you.

- Full data recovery – through quick and deep scans you can recover any data that you may have lost.
- Recover multiple data file formats – you can recover pictures, videos, audio, documents, archives and emails
- Risk free data recovery – this is a read-only process and nothing gets written to your drive, which means no files will be changed.
- Full Preview of files – you can preview the data before you actually recover it, thereby giving you more control over the recovery process.
Step-by-step guide to recover lost data using iSkysoft Data Recover for Mac
Step 1. Launch Recoverit (IS) and choose data to be recovered
Once you launch the program, you will be presented with 6 types of data to recover. These are photo, email, music, document, video and others. Choose the files that you would like to recover, or simply choose “All File Types” and then click on the “Next” button in order to proceed.
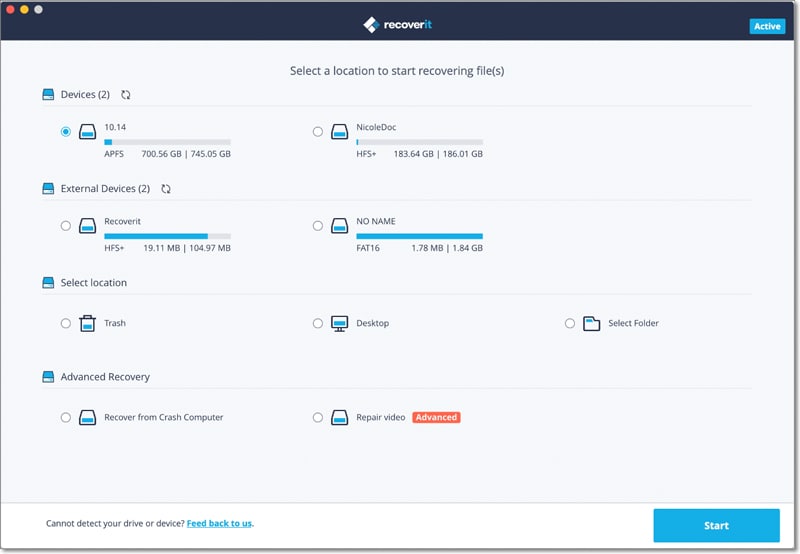
Step 2: Choose target location
You will be presented with a list of possible locations – Common location, Hard Disk, External Removable Device and I can’t find my partition. Choose one of the locations and then hit the “Start” button to start the scanning process.

Step 3: Recover lost data
This performs a quick scan of the selected files and will take a short while to complete. You will then be shown previews of the files that have been scanned and are ready for recovery. Recoverit (IS) for Mac allows you to preview the data before you can recover it. Do so and select only the files you need. After you have previewed and selected the files that you want to recover, hit the “recover” button and wait for the files to be recovered.

Part 3: Mac Apps Damaged or Can't be Opened
Upgrading to MacOS High Sierra may mean that some of your older apps will not run. You will get a prompt saying “Damaged and cannot be opened”. Here are ways to rectify this:
- Clear the cache
- Use Command+Option+P or R to restart your Mac since this will clear the PRAM
- Update your apps to the latest versions which may work with High Sierra
- Use Command or Option when starting the apps
Part 4: MacOS High Sierra won't Restart
Updating sometimes stops the Mac from restarting. This may be the case with High Sierra. Here is what you need to do:
- Reset the PRAM using Command+Option+P or R
Part 5: Mac Runs Slower than before
Computers can sometimes slow down after a system upgrade due to new features. If your Mac slows down after upgrading to MacOS High Sierra do the following:
- Reboot the Mac once more and disable apps that take up a lot of resources. Check the resource usage on the Activity Monitor
- Clear the cache
- You may also go to Disk Utility and run the Repair Disk Tool
Part 6: How to Downgrade from MacOS High Sierra to MacOS Sierra
You may find that the MacOS High Sierra is not good for you, and decide to downgrade to MacOS Sierra. This article will show you in detail how you can go about this. Though the process may seem to be a bit complicated, following it properly will ensure that you go back to Sierra without any complications.
Back up your Mac
Downgrading will fully erase MacOS High Sierra from your computer together will all files and documents that you may have created using it. You therefore need to create a backup copy of your computer on an external hard drive or any of the cloud-based online storage sites.
Create a bootable drive of MacOS Sierra
Download MacOS Sierra from the Mac App Store and then create a bootable disk from the installer. You should already have this disk, since it will no longer be available once the final release of High Sierra is launched.
Erase MacOS High Sierra
Using Wi-Fi or Ethernet, connect your Mac to the Internet
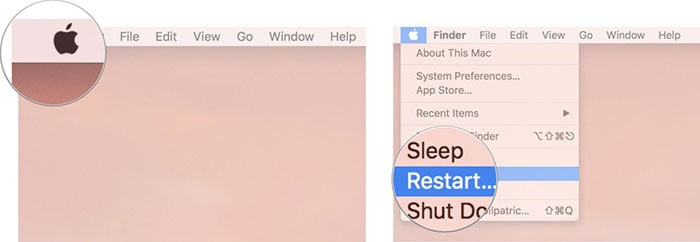
Now select the Apple icon
From the dropdown menu, select “Restart”.
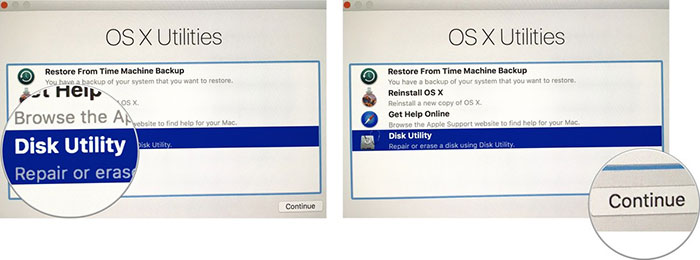
Put the Mac into Recovery Mode by pressing and holding Command+R until the computer reboots Go to the OS X Utilities selector and then click on “Disk Utility”. Now click on “Continue”.
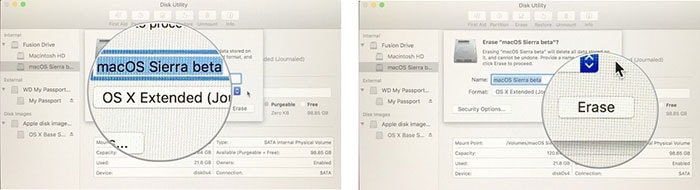
Now select the startup disk of choice and then click on “erase”.

Now choose a name for the file that will be destroyed. Any name will do From the format list, choose “Mac OS Extended (Journaled)” Now click on erase.
In order to go back to the OS X Utilities selector after the process is completed, simply go to the dropdown menu in the top left side of the screen and quit Disk Utility.
Reinstall MacOS Sierra
Now you can begin installing MacOS Sierra on your computer.
Once again, use your Wi-Fi or Ethernet connection to access the Internet.
Click on the Apple icon like you did before.
From the dropdown menu, choose “Restart”.
Make sure that you hold “Option” as you Mac restarts. This will enable you to access the option from which you will select the startup disk. From the list of startup disks, choose MacOS Sierra and the installation will immediately begin. Click on “Continue” when the MacOS Sierra installation window pops up. Now MacOS Sierra will install like you were updating from an earlier operating system version. Simply agree to the terms and conditions and then wait until the computer reboots.
Install MacOS Sierra from a Time Machine Backup
If you had created a backup of MacOS Sierra before you upgraded to MacOS High Sierra, you can use this backup to downgrade.
Connect to the Internet through your Ethernet or Wi-Fi connection
Select the Apple icon and then choose “Restart” from the dropdown menu
Press and hold Command+R as the computer restarts and keep this pressed until the reboot process is complete
In the OS X Utilities selector, choose “restore from Time Machine Backup” and then click on “Continue”.
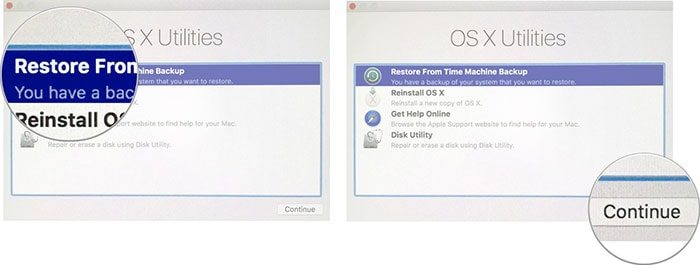
Make sure that you read all the important information on the screen before you click on “Continue. Choose the “Backup Source” where you had saved the Time Machine backup file. Now choose the recent MacOS Sierra backup on the source drive, before clicking on “Continue”.

The computer will start installing MacOS Sierra from the Time Machine backup file. When the process is complete, the computer will reboot and the downgrade will be complete. This may take a while so you have to be patient.


