


Contents
- 1.1 Memory Card Recovery
- 1.2 Recover Deleted Files from Memory Card
- 1.3 Recover Formatted Memory Card
- 1.4 Recover Corrupted Memory Card
- 1.5 Recover Transcend Memory Card
- 1.6 Recover Kingston Memory Card
- 1.7 Recover SanDisk Memory Card
- 1.8 Top Memory Card Recovery Software
- 1.9 Top Memory Card Recovery Freeware
- 2. SD Card
- 2.1 What is SD Card
- 2.2 SD Card Recovery
- 2.3 Recover Deleted Pictures from SD Card
- 2.4 Recover Deleted Videos from SD Card
- 2.5 Recover Damaged SD Card
- 2.6 Recover Corrupted SD Card
- 2.7 Recover Formatted SD Card
- 2.8 SDHC Card Recovery
- 2.9 SDXC Card Recovery
- 2.10 Top SD Card Recovery Software
- 2.11 Top SD Card Recovery Freeware
- 4.1 Micro SD Card Recovery
- 4.2 Micro SDHC Card Recovery
- 4.3 Micro SDXC Card Recovery
- 4.4 Recover Samsung Micro SD Card
- 5.1 CF Card Recovery
- 5.2 Recover Formatted CF Card
- 5.3 Recover Damaged CF Card
- 5.4 Recover Corrupted CF Card
The Secure Digital Xtra Capacity (SDXC) Memory Cards make it possible to effectively manage large files. This can accommodate large files with impressive speed to write and read files without interruption. Furthermore, due to design constraints of recording devices like smart phones, tablets and digital cameras, microSDXC were developed to be as compact as possible.
However, despite proper care and handling, losing some or all of the files may happen either through unintentional deletion or through actions and virus infection that could cause file corruption. This makes micro SDXC card recovery solution a vital tool to retrieve the lost files, some of which are very important for school, work or for personal reasons. In this article, you'll learn how to accomplish the task in only a few steps.
Part 1. How to Recover Files from Micro SDXC Card on Mac

MicroSDXC card data recovery on Mac OSX computers is made fast and easy by iSkySoft Data Recovery for Mac. With powerful features that allow the program to do a deep system scan on the computer. The program provides the users the chance to choose and preview scanned files before the actual recovery, users definitely have control over the recovery process.
Download and install iSkysoft Data Recovery for Mac on your computer, then follow the tutorial below to recover deleted photos, videos and other files from micro SDXC cards. And you can get more solutions and tips about card data recovery here.
What You Will Need:
Mac Computer;
Recoverit (IS) for Mac
Time Required:
Time will vary according to file's size
Difficulty:
Easy

Step 1. Select the Recovery Option
Once installed, you may launch the data recovery program from the Applications folder. The main page will show several recovery options from which you will need to select target file types and click "Next" button.

Step 2. Deep Scan Your Micro SDXC Card
Make sure that the SDXC card is inserted and identified by the machine. Once you've entered into the next window, you'll see your card listed on the interface. After selecting the micro SDXC drive, click on the "Start" button to scan the selected drive. In rare instances when the files you were looking for, you may click on the "Deep Scan" on the bottom of the window.
Note: If the drive does not appear on the list, simply click on the "Refresh" icon located on the right hand side of the "External Removable Device". The card cannot be scanned if it cannot be read.

Step 3. Recover Data after Previewing
Once the scan is complete, the program would show the files that it found allowing you to select which ones to recover. Tick the data you need and then click on the "Recover" button to restore the files to your computer.
Part 2. How to Recover Data from Micro SDXC Card on Windows
iSkySoft also makes it possible to recover lost files of different types from a micro SDXC card through a Windows computer. Built with advanced and powerful deep scan technology, iSkysoft Data Recovery for Windows can search deep into the drive to get better results. The intuitive design also ensures that users have full control over the process through user activated features and selection so users get exactly what they need.
From recovery mode to the files to recover, users get to select the one that fits their need. Wizard recovery mode is also optimized for the recovery of specific files from a specific drive. Users can choose to scan a specific file type from a defined location and the program takes care of the rest. This makes recovery less time consuming.
To use iSkysoft Data Recovery on a Windows computer, you can follow the steps after the download and installation.
What You Will Need:
A Computer;
Recoverit (IS) for Windows
Time Required:
Time will vary according to file's size
Difficulty:
Easy
Step 1. Enter into Recovery Mode
The main page would give you several options for data recovery. The easiest way is through "Wizard Recovery" mode, which lets you set the type of file to recover as well as the location of the lost files. The program takes care of the rest of the settings for you.
Another mode which lets you specify the drive to be scanned and to recover files of any type is the "Lost File Recovery" mode. This option allows you to recover deleted and formatted data, such as those erased by Shift + Del or removed from the Recycle Bin. When attempting to recover files on a micro SDXC card through this mode, just select "Lost File Recovery" from the main menu and click next.

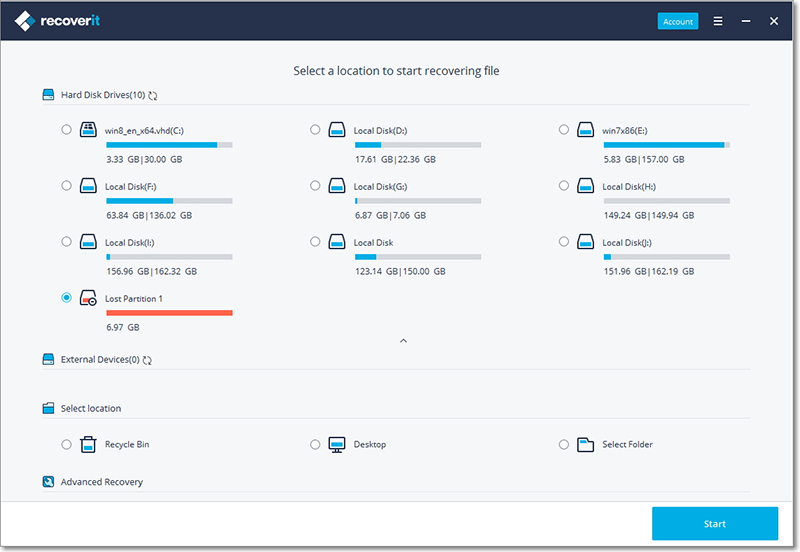
Step 2. Scan Your Memory Card
On the next screen look for your micro SDXC drive and highlight it. If the micro SDXC drive is not available, check the physical card. Make sure it is inserted properly and detected by the machine. After selecting the correct drive, click the "Start" button. The program will start scanning for recoverable files.

Step 3. Preview and Recover Lost Data
After scanning, all files that the program was able to find will be shown. From the list, you may select which ones to recover. Once done, you may click the "Recover" button and wait for the program to finish recovering the files.
To protect the micro SDXC card from data loss, make sure not to format it unnecessarily, stay away from virus infection and be careful with power failures as these are the common reasons of file damage or corruption. In the event that you notice or suspect the loss of files, you may take the card immediately, avoiding the possibility of your device overriding the existing but missing files. Finally, be careful not to make further changes on the card before the recovery including reformatting it for better chances of successful card file recovery.


