


It happens a lot! You're putting the final touches to a report that is due at work the following day. Unfortunately, due to a recent bout of procrastination, it is how midnight and you are hacking away at your laptop trying to complete the report. Except, Microsoft word has a mind of its own and just when you type in the final word and hit save, the program chooses to fall apart, all your work disappearing in the process. You desperately try to find a solution but all your efforts are in vain. You simply cannot pinpoint the exact problem. Nor can you figure out just how to find recovered word documents. If this sounds like what you're going through, worry not! There are a lot of ways to get your document back. In fact, in this article we are going to show you 11 different ways to get your Word document back. Let's begin with the less stressful and most successful way.
Part 1: The Best Method to Find Recovered Word Documents
We are sure you have better things to do than spend all night trying to figure out exactly what happened to your document or try to re-invent ways to recover it. This is the main reason why we recommend using iSkysoft Data Recovery for Mac (or iSkysoft Data Recovery for Windows) This program is designed to scan the drives on your computer to find the missing file all with little or no input for you. This means that instead of spending hours trying to figure out just what happened to the file, you can employ the services of Recoverit (IS) and have the document back in a few minutes.
Key Features of Recoverit (IS):
- It is very easy to use. The program excels at scanning the drive for the missing Word document and allowing you to easily re-save the file in a new location.

- It can also be used to recover other types of data, not just documents. You can use it to recover videos, music, photos and many more, making it a worthy investment even after you solve this problem.
- It is compatible with all versions of Windows and Mac including Windows 10 and macOS Sierra.
- It will recover any lost data from your computer regardless of how the data was lost in the first place.
- The program allows users to preview the files recovered after scanning the drive. This way you can only recover the files you need.
Step-by-Step Guide to Find Recovered Word Document
Step 1. Download Recoverit (IS) to your Mac. It is important that you download this program to a different folder than the one containing your lost Word document. This is a precautionary measure to ensure that the lost data is not overwritten, thereby making it almost impossible to recover.
Follow the prompts in the installation Wizard and then launch the program. You should see the following window. From the main interface select the right file types according to your request. Then click "Next" button.

Step 2. Here, select the drive that likely contains the missing file and then click "Start" to begin the scanning process.

Step 3. The scanning process itself shouldn't take too long although the duration may depend on the size of the drive and how much data is on the drive. Once the scan is complete, you should see a detailed list of all the data on the drive. Now all you have to do is select the data you would like to recover and then click "Recover" to save the document.
Select a folder to save the document. It is advisable that you select a different folder. It might even be safer for you to save the recovered document in an external drive.

Note:
- The files found after the scan will be displayed in their original filenames. In case you don't remember the filename you used when saving the file, you can use the search filter to conduct a search based on the closest keywords.
- You can use the "Deep Scan" option to perform a deeper, more comprehensive scan of your drive. This is a great option if you were unable to find the file using a normal scan.
- You can keep all of the scan results. These can be used for future recovery.
- The status of the file lets you know whether the file is good for recovery or not. There are some files that cannot be recovered.
Part 2: 10 Other Methods to Find Recovered Word Documents
But what if you don't want to use a Data Recover software? It is definitely easier to use a tool like Recoverit (IS) for Windows because it is easier and less of a hassle. But you should be aware that Windows does provide you with a number of ways to try and find the recovered file within the system. Below we have outlined 10 different ways you can do this. But a word of caution: it is important that even as you try one or each of the following methods, you must refrain from saving any more files on that drive. This will prevent overwriting data on that drive and make it easier to recover the file just in case you have to.
Method 1. Search for the File on the Windows System
Windows allows users to search for just about any file on their computer quickly and easily. Chances are that you already know how to do this. But here are the steps anyway.
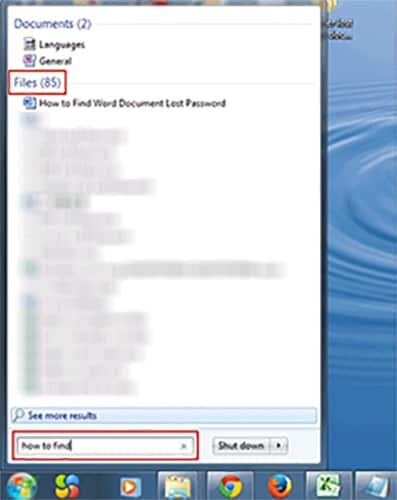
In Windows click on the Start Menu and then Click Search. If you are using Windows 10 click on the "Search" icon next to the start menu, at the bottom of the screen. In the search box, type in the filename or the section of the filename that you remember. If you don't remember any of these, type in .docx to get all Word documents. Hit search.
If you are unable to find the file, select "My Computer" under "Look in" and under "More Advanced Options" make sure that the "Search Hidden Files and Folders" is enabled and try again. If you find the file, click on it and then save it in a new location.
Method 2. Try the Recycle Bin
This method may only work if you actually deleted the file and it is now in the recycle bin. We know you know how to do this as well but here’s how to do it anyway.
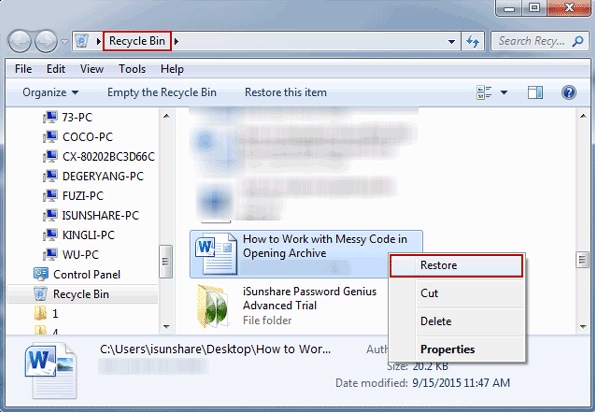
Open the recycle bin by clicking in its icon on the desktop. You should then be able to see all of the files that have been deleted. If you see the missing doc, right-click on it and then choose "Restore".
It will be restored to the original fil location. In case, you don't remember how to find the folder, simply search for it like we did in method 1. If, however, you don't find the document in the Recycle folder, it may mean that you never deleted it or you may have emptied the recycle bin at some point.
Method 3. Restart Word and Hope You Find It in Auto Recovery
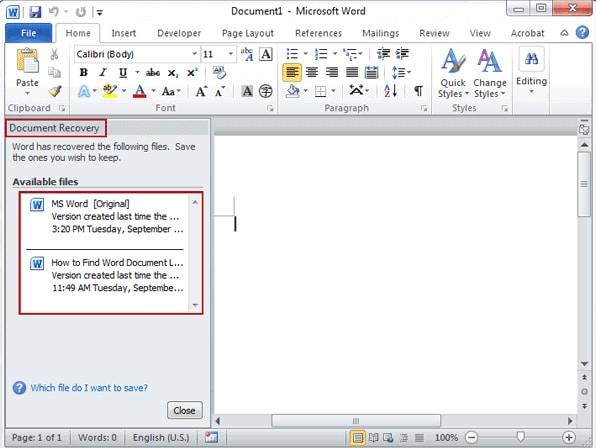
If it is not in the recycle bin, the good news is that you may not have deleted the file after all. You may even be able to find in Word’s recovery panel. In order to trigger the launch of the recovery panel in Word, restart the program. Under normal circumstances, Word often opens with a document recovery task pane. If your missing document is there, simply double click on it to open it.
Make sure you save it in at least two different locations to avoid problems next time.
Method 4. Search for Auto Recover Files Yourself
If the Word Recovery Task pane doesn't open up, don't despair! You can find the Auto recovery files yourself. Just follow these very simple steps to do it.
Step 1. Within Microsoft Word, go to "Tools" and then select "Options".
Step 2. Under the "File Locations" tab, double click on "Auto Recover Files" and note the path location. Now click "Cancel" and close the window.
Step 3. In Windows Explorer or My computer open up the folder that you made note of. Search for any .asd files. You can also conduct a search like the in method one only this time look for .asd files.
Method 5. Check the Original Folder for .wbk Files
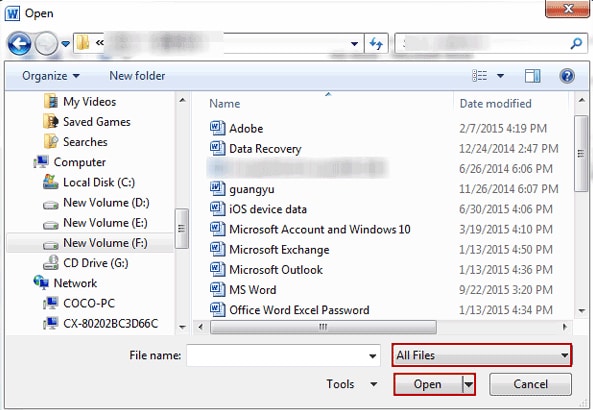
You may have a chance if you have set Word to automatically create a backup of all the documents. You can check for the .wbk file. Just follow these simple steps. Open Word and then click on the File Menu. Select "Open" and navigate to the folder you think you may have saved the missing document. Make sure that the "All Files" option is selected. This is the only way to ensure that all file types will be displayed.
If you see any .wbk files there. Select it and see if it is what you are looking for. If it is, double click on the file and save it again.
Method 6. Search for the Word Document Backup
Just because you were unable to find the word backup files in the folder you may have saved the missing document in doesn't mean it may not be there. To make sure that there are no ". wbk" files you may be missing, it is a good idea to conduct a search for the backup files. Again click on the Start Menu and then "Search". In the search filed, enter ".wbk files". You may find quite a number of them. Click on each one by one until you find the file you are looking for. When you do, save the file in a different folder (one that's easy to remember this time.)
Method 7. Search for Temporary Files
If you don't find any Word Backup files and any of the above solutions have all failed, you may be getting a little desperate. Your desperation is to be expected but you can try a few more things before giving up completely. It is likely that the file may be in among your temporary files. Finding out is easy: just conduct a search like we've done before.
Click on the Start Menu, locate Search and this time type in .TMP files. This will probably bring up a lot of search results because .TMP files normally include all of the update packages for the software on your computer and even the files you download off the internet but don't save on your computer.
To make it easier for you to find the document, change the "When was it Modified?" option to the last week or so. If you find the missing document, double click on the file name to open it and then save the file in a new location.
Method 8. Do a More Thorough Search for Your Temporary Files
Were you unable to locate the temporary files? Sometimes they have different files extensions with the "~" instead of an actual file extension. In the spirit of doing all we can before giving up, it might be a good idea to search for the "~" files. Once again click on the Start Menu and in the search bar enter "~". This should open all of the temporary files on the computer. Just search through the folders for the document you lost and when you find it, double click on it to open it up. Make sure you save it on a folder in a better location.
Method 9. Open the Temp Folder
Now we are almost out of options but there is still a couple left. If you were unable to find the document in the temporary files section, it may just be because you didn't get all the search results. If you suspect that this is what happened, you may want to go straight to the source by opening the temp folder itself. This folder is usually hidden so you may have to use Windows Explorer. Go to Start and then click on "All programs".
From here go to "Accessories" and then "Windows Explorer". Find the file that is marked "User" or whatever name your computer calls you. If you see the file in there, double click on it to open it. If not, try out final option.
Method 10. Search for Hidden Files (Windows 7 and 8)
Here, find the "Roaming" folder and then the "Microsoft" folder and then finally the "Word" folder. Check for your file here. If it's there, double click on it to open it and then save it in a new location.
If you try all of the options listed above and you're still unable to find the document. You may want to use iSkysoft Data Recover for Windows. As long as the file was not overwritten, this program will find in in no time.


