


Losing data on your computer can be a highly stressful situation especially when you accidentally deleted the data and have no idea what to so. While we are all used to backing up our smartphones and tablets, very few people will actually backup the data on their desktops or laptops or will rarely do so. This means that when you do lose the data on these devices, the way to restore lost files is not as easy as simply getting back the data from a backup. If you have recently lost data on your computer, this article will offer you a complete guide on just how you can get the data back whether you are using Windows, Mac or Linux OS.
Part 1: How to Restore Lost Files from Mac
The best way to restore lost files on the Mac is to uses data recovery program such as iSkysoft Data Recovery for Mac. The program is easy to use and very effective in data recovery. The following are just some of the features that make it the ideal solution for restoring lost files.
Key Features of Recoverit (IS):
- The program is highly specialized in data recovery with features that are all designed to do all the hard work, allowing you to recover lost files in a few simple clicks.
- Data recovery can be completed in just a few minutes and in a few simple steps as we shall see very shortly.

- It can be used to recover just about any type of data including lost documents, videos, photos and even emails among many others.
- The program guarantees 100% safety of all the other data on your MAC. It utilizes read-only technology and so will not alter any of the data on your Mac.
- It is compatible with all versions of Mac OS.
Step-by-Step Guide to Restore Lost Files
Step 1. Begin by downloading and installing the program to your Mac. To avoid overwriting the data you would like to recover, we highly recommend that you install the application on a different drive. Once the program is installed, launch it and you should see the following primary window, displaying 6 different file types for you. Select wanted file types from the options presented in this primary window and click "Next" button.

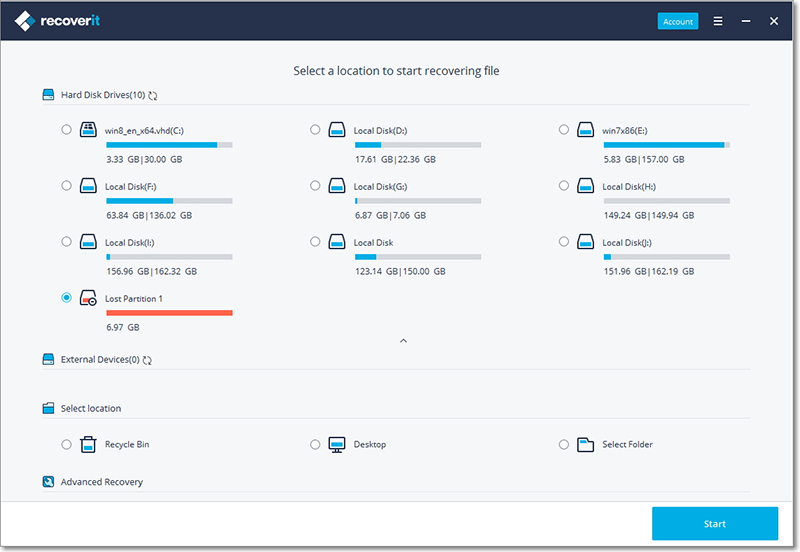
Step 2. In the resultant window, select the drive that contained the now lost data and then click on the "Start" button to begin scanning that drive. If you don't see the drive on the "External Removable Device" list in this window, click on "Refresh" icon.


Part 2: How to Restore Lost Files from Windows
If you are using Windows, iSkysoft Data Recovery for Windows can help. Like it's Mac counterpart, the program is just as effective and easy to use. Some of its features include the following.
Key Features of Recoverit (IS):
- It is compatible with all versions of Windows OS including Windows 10.
- It can also be used to recovery just about any type of data from your Windows system including videos, photos, document and many more.
- It is also 100% safe to use. None of the data on your computer will be altered in any way. There will also be no damage to your computer’s software or hardware.
Step-by-Step Guide to Restore Lost Files
The following is a step by step guide to help you get all of your lost data back. But before we begin, download and install the program to your Windows computer. It is important to ensure that you install the program on a separate to avoid overwriting the data you are trying to recover. Once you have successfully installed the program, follow these very simple steps to get your data back.
Step 1. Launch the program and you should see the following primary window, with four different recovery modes.
Step 2. To recover lost data, we will be using the "Lost Data Recovery" mode which ideal for recovering data that has been lost due to accidental deletion, file corruption or when you empty the recycle bin. When you select this mode, you should see the following window. Go ahead and select the drive that could contain the missing data and then click "Start" to begin scanning the drive. You can also click on "Enable Deep Scan" to scan the drive more thoroughly for the missing files.

Step 3. Once the scan is complete, you will be able to see all of the data on that drive. Now all you have to do is select the missing data from the files displayed in this window and then click "Recover".

Save the recovered file once again on a different folder. If possible, save the file on a different drive or better yet an external storage device.
Part 3: How to Restore Lost Files from Linux
For Linux users the recovery process can also be completed using data recovery tools. One of the most commonly used file rescue tools for Linux OS is Ddrescue. This is a command line tool that will copy data from one file block to another. It is highly effective but before you make use of this tool to recover your lost files, here are a few things you need to.
- You should never use this tool on a read/write mounted drive or partition.
- Do not try to repair a file system that has I/O errors.
- The destination will be overwritten. So before you use this tool to recover any of the data ensure that the destination is free of all vital data.
To use it, you would first of all have to install the tool on your working system and then attach the drive with the lost data and the destination drive via USB. You can install the tool on an Ubuntu system using a single command:

Recovering the data can also be completed using another single command.

The above command will copy everything to the destination drive, thereby recovering the missing data. You can then simply open the recovered file from the destination folder.
We hope this guide has been helpful in recovering lost data on Windows, Mac and Linux. Keep in mind that a simple backup system will go a long way in helping you avoid these problems. But in case you are unable or you forget to back up your data, software such as Recoverit (IS) for Mac can be very helpful.


