


A hard drive is a storage location and saves large amounts of data. Usually, the data within the drive spreads into five parts based on the characteristics – MBR, DBR, FAT, DIR, and DATA. Unless you have a problem accessing the hard disk, you will not come to understand the importance of data backup. The reason behind the loss of data or unresponsive hard drive is due to physical damage, power surge, and software corruption. Now, it is time to get more tips on how to retrieve data from hard drive.
Part 1. The Most Recommended Method to Retrieve Data from Hard Drive
Recovering data from a failed hard drive using online software possess greater challenge due to the limitations and the inability to detect the parts of the hard disk. It is here that the recommended procedure comes to your rescue. With the convenience of iSkysoft Data Recovery for Mac (or iSkysoft Data Recovery for Windows), you gain the possibility to recover the maximum data from your corrupted or damaged hard disk. Why is it the recommended solution? Well, the following are the reasons why iSkysoft is the leading solution for all your data retrieval needs.
Key Features of Recoverit (IS):
- The primary reason is its efficiency in detecting maximum data from any corrupted or damaged disk.
- It assists in recovery everything from your Mac, including all your files that contain photos, music, emails, videos, documents, and just anything else present on your drive.
- Additionally, the software is compatible with Mac OS X from 10.5 and above. You can even recover data from NTFS, FAT16, FAT32, HFSX, and HFS+ file systems with ease.
- The improved scanning technology helps in recovery of data from any Mac-based hard disk. The process of recovery is additionally simple – just three steps!
Step-by-Step Guide to Retrieve Hard Drive Data
Step 1 Launch Recoverit (IS)
Visit the official website of Recoverit (IS) site and download the software for your Mac. Install the program if you are able to access the hard drive, else install it onto a USB drive using another Mac and then perform the recovery using the USB flash drive for your hard disk that you wish to recover. As the program launches, you will notice four options appearing right on the screen of the software. You have to choose the type of files and click "Next" button.

Step 2 Choose a Partition
The option will allow you to retrieve as much as content as possible from a corrupted, damaged, or accidentally deleted data from a hard disk. Upon choosing the option, you will notice a new screen opening up, where you will see all the drives.
If you do not see your drive, you can press the "Refresh" icon next to "External Removable Device". It will allow the software to perform a refresh and display the partitions once again. Then click "Start" button and wait for the program to complete the scanning action. The time consumption is dependent on the file size of the hard drive and the number of partitions.

Step 3 Retrieve Data from Hard Drive
After scanning, it will display all the recoverable content along with its validity (good or bad). You can now select the necessary files or those that you want to recover by checking them in the checkbox provided. Do look out for the validity of the data. After finishing the selection process, press the "Recover" button at the buttom to save the files. Ensure that the destination is on an external hard drive. Allow the program to complete the process, after which you can browse the destination path to look at the retrieved files.

Notes:
- Deep scan technology recovers additional files, even from a formatted hard drive.
- You can save the scan results and perform the retrieval of the same at a later stage.
- The preview feature supports emails, documents, photos, and certain portions of audio and video files.
- The validity attribute makes sure that it is easy for the program to recover the file.
Part 2. How to Retrieve Data from Hard Drive Without Formatting
We are considering Windows 7 here because it still does possess a large market share.
Step-by-Step Guide to Retrieve Data from Hard Drive
Step 1. When you start your computer, which shut down accidentally or due to power failure, it will display the following screen on the next boot.
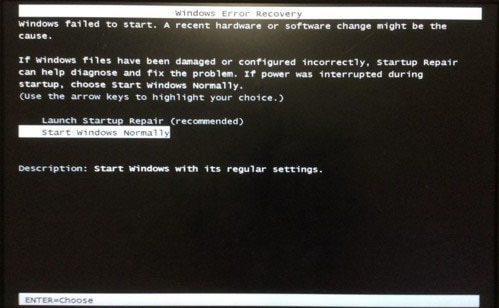
Step 2. Choose "Launch Startup Repair" option to allow Window 7 to repair the file system and allow you to login to the hard drive. Select within the countdown displayed on the screen. Enable the os to perform necessary action before it restarts and allows you to access the partitions. You can then use external hard drive to create a backup of the content and reformat the troubling hard disk.
Part 3. How to Retrieve Data from Hard Drive after Format
Retrieving data from a formatted hard drive is not possible without the use of a third party recovery tool. In addition to the software, you would also require a working computer so that you can plug the non-functional or formatted disk and retrieve content from it using the software that you would be installing it on the functional hard drive of the computer. The chances of success for such cases are most likely dependent on luck because formatting the disk overwrites the previous data, making it impossible to retrieve. Sometimes, even a recovery tool fails to get back the data in such scenarios. The only way you could get back the data in failure cases is to turn towards a professional data recovery expert.
Conclusion:
Given the details in this post, it does make sense to use Recoverit (IS) tool for recovering all the valuable content from your damaged or corrupted hard drive. It only holds good until you format the disk. If you want to use the program after formatting a disk, well, you can try your luck!


