


You've heard it so many times before and you'll hear it again. Backing up your device is one of the most important actions you can take to ensure that your data remains secure in case you lose it. And if you are wondering, it is very easy to lose all of the data on your iPhone, iPad or iPod. Sometimes all you need to do is accidentally tap delete when you meant to tap share and that photo or video is gone forever. Other times it's not even your fault. We've all heard of the data loss that can be caused by a system upgrade. While there are very many data recover programs that promise to help you get your deleted data back, do you really want to risk damage to the device or your remaining data. Avoiding all of these problems is very easy; just backup your device. In case you are wondering how to backup data from iOS 10 to Mac, the following article will explore a few great ways.
Part 1 : How to Backup Data from iOS 10 to Mac Easily
Backing up your data on your Mac is a great solution because your data will be safe and also very easily accessible whenever you need to restore it to your device. The only problem is that without the right tool backing up your iOS 10 device to your Mac can be quite difficult. Fortunately for you, we have a program that is designed for this purpose. With MobileTrans for Mac (or MobileTrans for Windows), you can easily create a full backup of all the data on your iOS 10 device to your Mac. And that’s not all MobileTrans for Mac can do.
Key Features of MobileTrans:
- You can use MobileTrans for Mac to transfer data between devices.

- All data types including contacts, apps, call logs, messages, calendar and many more can be backed up or transferred between devices.
- Creating a backup of all the data on your device to your Mac is easy and seamless.
- It is compatible with almost all iOS devices.
Step-by-Step Guide to Backup Data from iOS 10 to Mac Easily
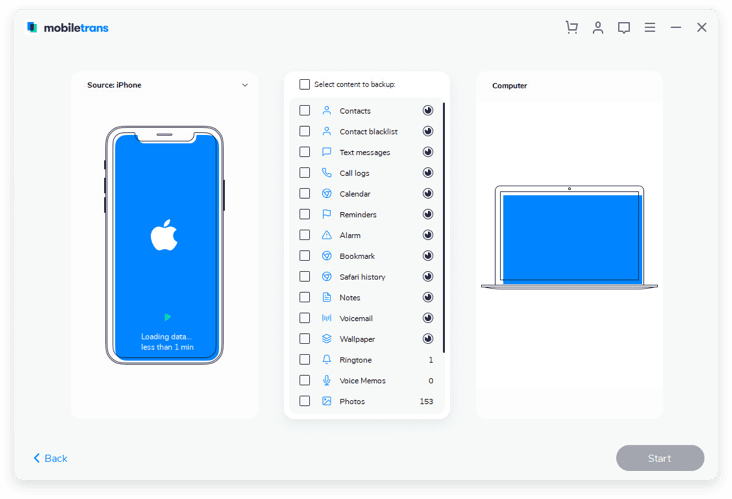
Step 1. Download and install the program to start the process. In the primary window, you should see a number options. Select "Back Up Your Phone" to launch the backup window.

Step 2. Connect your phone or tablet to the Mac using USB cables and you should see the data on your device displayed in the middle panel as shown in the window below.
Part 2 : How to Backup Data from iOS 10 to Mac Using iCloud
You can't actually backup data from iOS 10 to Mac using iCloud but you can access your iCloud Backups on your Mac just in case something goes wrong with your device and you need to restore the iCloud Backups. In this section we are going to backup data on your iOS 10 device to iCloud and then show you how you can access these iCloud Backup files on your Mac.
Step-by-Step Guide to Backup Data from iOS 10 to Mac Using iCloud
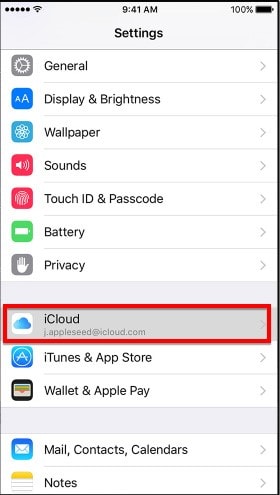
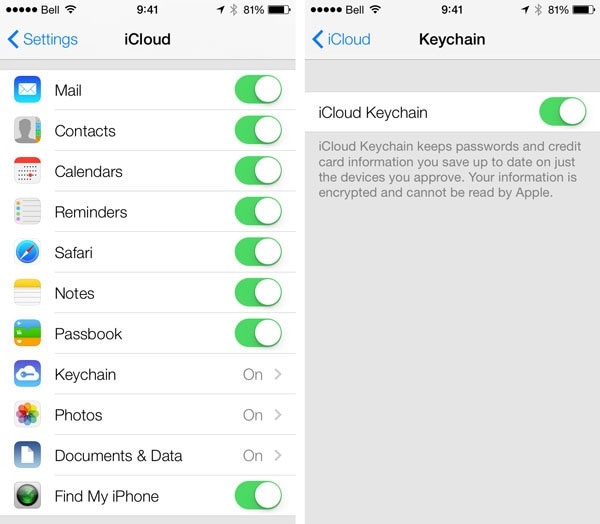
Step 1. Connect your device to a Wi-Fi network if it isn't already connected and then launch the settings app on your device. Scroll down the Settings menu and tap on "iCloud".
Step 2. Scroll down to tap "Backup" and then make sure that "iCloud Backup" is turned on.
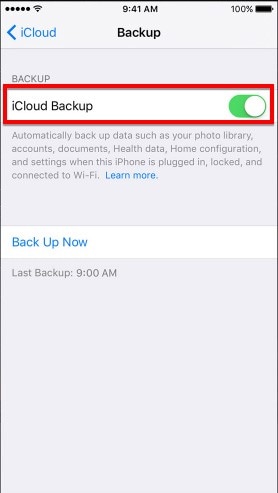
Step 3. Tap "Backup Now" and then stay connected to the Wi-Fi network until the process is complete. You can make sure that the backup was created by going to Settings > iCloud > Storage > Manage Storage and select your device. the Backup should appear here along with the time it was created and the size of the backup.
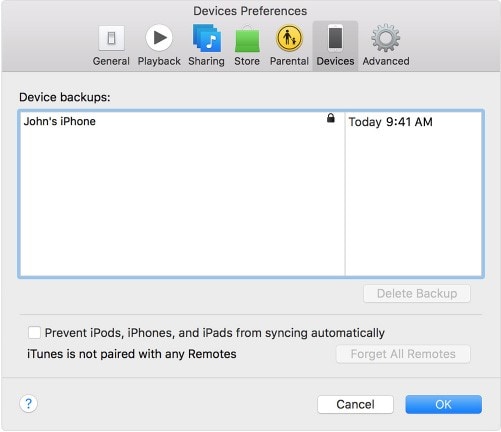
You can access this same backup on your Mac and easily transfer the file for storage on the Mac itself. Here's how to access an iCloud backup file on a Mac.
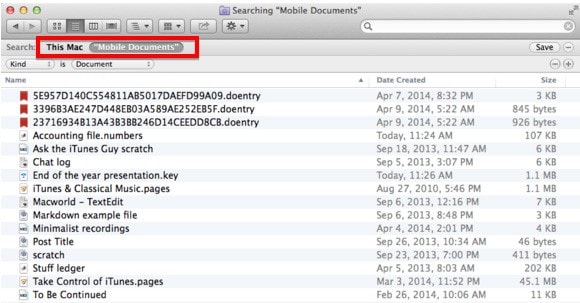
1. On your Mac, go to Finder > Go > Go to Folder. You should see a number of subfolders for each app on both iOS and OSX.

2. To find files that were backed up on your iOS device, ensure that "Mobile Documents" is selected as opposed to "This Mac".
Part 3: How to Backup Data from iOS 10 to Mac Using iTunes
Alternatively, you can also backup your iOS 10 device using iTunes, in this way, the backup will be available on your Mac anytime you need to restore it. before we begin, it is important that you ensure you have the latest version of iTunes on your Mac. If you don't take a moment to install the latest version to ensure that there will be no problems during the backup process. Once you have the latest version of iTunes, follow these very simple steps to back up your iOS 10 device using iTunes.
Step-by-Step Guide to Backup Data from iOS 10 to Mac Using iTunes
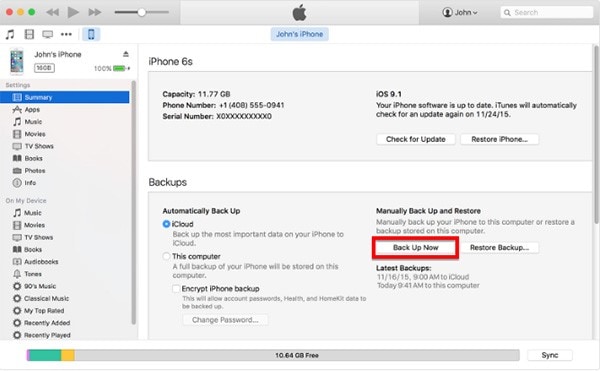
Step 1. Open iTunes and then connect the device to your computer using USB cables. If you are asked for the passcode or to "Trust this computer" follow the on screen steps to do it.
Step 2. Select the device when it appears in iTunes and then click "Back Up Now".
Part 4: Troubleshooting on Upgrading to iOS 10
So iOS 10 is now available for download and although it does come with a lot of new and improved features, there are also a number of errors that many people have faced when upgrading to the new iOS. In this section we are going to look at some of the most common iOS 10 issues and how you can fix them.
1. Error 14 Occurring Soon after Upgrading
The error 14 is a common problem with many software updates. It mainly manifests as a message in iTunes saying, “The iPhone/iPad could not be restored. An unknown error occurred (14). To fix it try backing up the device and then do a clean restore of iOS 9.3.2. You should also check that the USB cable you are using is working correctly or change cables. Finally ensure that you have the latest version of Xcode 8 installed on your Mac before attempting the update again.

2. iPhone/iPad Fails to Verify Update
This is another very common problem that iOS device users encounter when trying to update to iOS 10 over the air. It is usually characterized by the screen getting stuck on the "Verifying Update" message for hours on end. The following are just some of the troubleshooting actions you can try to implement to fix the problem.
- Turn off your device and then turn it on again. Press the power button several times (about 5 times).
- If that doesn't work, try a hard reset. Hold down the "Home" button and "Sleep/Wake" button at the same time and release them when the Apple Logo appears.
- You can always also try updating via iTunes if the problem persists.

3. A Failed Update
Sometimes the update can just fail. When you try to update to iOS 10 but receive a message that "Software Update Failed". This error usually occurs because a lot of people are trying to update their device simultaneously. The following are some troubleshooting options.
- Simply wait a few days before trying again.
- You could also reboot both the Wi-Fi router and the iOS device and then try again.
- If that doesn't work, reset the network settings on your device. You can do that by going to Settings > General > Reset > Reset Network settings.
- If all else fails, you can simply try to update the device via iTunes.

4. iPhone/iPad stuck on the "Slide to Upgrade" screen
This is another problem that is fairly common but also among one of the scariest because the device is stuck on the "Slide to Upgrade" screen and there us really not much you can do on it. If you are experiencing this problem, one of the following solution should work.
1. Connect the device to your computer and then open iTunes. Press the "Sleep/Wake" button and "Home" button at the same time until iTunes detects the device.
2. Now restore your device from the backup you created before updating to iOS 10.

That should fix the problem and you can attempt the update again.
5. Your iPhone or iPad Gets Stuck in Recovery Mode during Upgrade
Your update seems to be going smoothly only for the device to get stuck in recovery mode right after. The reasons behind this problem are relatively unknown although there are some things you can try to fix it.
- Hold the home and power buttons to see if the device can exit recovery mode.
- Also check that the lightning port you are using is good or if you are having any other issues stopping you from updating to iOS 10.

6. Battery Problems After the Update
The issues with iOS 10 don't stop during the updating process. There are some people who have reported battery issues immediately after they upgraded to iOS 10. If you notice that your battery life is behaving weirdly after the update, here are a few things you can try.
Begin by doing a hard reboot by holding down the home and the power buttons at the same time until you see the Apple Logo.
If a hard reboot doesn't fix the problem, go to Settings > Usage > Battery Usage and check if any app is using the battery abnormally. If it is a third part app try uninstalling it. You can always re-install it from the App store later.
You can also try to toggle iCloud Keychain off. It is not clear why it works but it does. To do it just go to Settings > Navigate to iCloud > tap on the Keychain option and then turn it off. Reboot the device to see if the problem has been fixed.
If that doesn't work, try resetting the network settings. Go to Settings > General > Reset > reset All Settings. Be warned that this will lead to total data loss and you will have to restore the device from an iCloud or iTunes backup.
We hope the above solutions have been helpful with whatever iOS 10 issue you may be experiencing. But like with all iOS issues, Apple will offer a fix for all of the soon enough.


