


ZD Soft Screen Recorder is one of the simplest and powerful tools that you can use to record what is happening on your computer screen. This tool can record your full screen, certain regions, specific windows, and even your webcam. You can use it to create videos that have your own logo for purposes of branding your work. With this tool, you can create fantastic screen recordings which you can share with your audience.
- Part 1: How to Record Screen using ZD Soft Screen Recorder
- Part 2: Recommend the Best ZD Soft Screen Recorder Alternative
Detailed Guide to Record Screen with ZD Soft Screen Recorder
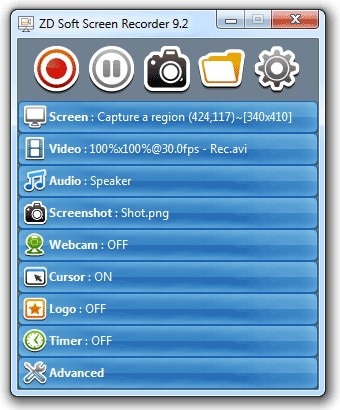
Step 1) Configure your video recording. When you launch it, you will get a floating interface which will help you configure your recording. Here are some of the features that you can tweak:
You can set the region that you want to record using the top button on the left side. When you click on the region button, it will automatically launch to full screen, and you can drag the edges to cover the area that you want to record;
You can then decide if you want your mouse cursor to be visible by clicking the second button on the left side; it has an icon of the cursor on it;
The next button shows you the frame rate at which your video is recording;
The gear button gives you access to advanced options;
On the bottom right side, you will see an icon that allows you to minimize the interface to your tray;
The next icon is the audio setting, where you choose whether to use the microphone, system audio or both;
The icon with a webcam on it allows you to overlay your webcam on your recording;
The icon on the top right shows you all your recording projects.
Step 2) Start your recording. Hit the big button in the middle to start your recording. You can pause the recording as you go along by hitting the pause button.
Step 3) Stop and save your recording. Hit the big red button at the center to stop your recording when you are done, and then save your video.
Best ZD Soft Screen Recorder Alternative - Filmora Video Editor
Filmora Video Editor is a powerful screen recording tool which allows you to output your video in high definition. This is ideal for those who want to create detailed and clear video recordings of their screen; ideal for tutorials and instructional videos.
Key Features of Filmora Video Editor
- High definition video – This is the most appealing feature of this tool. You can set the videos to record in high definition without using up much of your system resources. Every detail of the tutorial or instructional video will be visible to your viewers.
- Control of recording area – Customizing the area that you record helps you create videos that are focused on a certain aspect. If you are recording from a streaming site, you can set the region to cover the area of the player alone.
- Save audio from streaming websites – When watching video from streaming sites, you cannot download them. However, with this tool, you can record the videos and save them to your hard disk.
- Audio recording – You can record audio from your microphone when you are creating video tutorials. You can also record from your system audio when you are playing a game and want to share your game play with other players. You can also set both, when you want to record a chat conversation on Skype.
Step-by-step guide to record screen on Windows PC using ZD Soft Screen Recorder Alternative
When you are installing Aiseesoft, you can let it launch as soon as the installation is complete. If you already have it installed and have not run it, you can start it from your Start Menu.
Step 1: Select the recording region
Decide which region you want to record and then drag the recording overlay to cover this region only. You can also decide to record the full screen, or a particular window on your screen.
Step 2: Define your audio settings
This is the tricky part, and very important. For all chat calls, you should enable both the microphone and system audio so you can hear the other person. For game demos, you can use the system audio, or use both if you want to add your voice to the video on top of the game sound effects. For tutorials, you should only use the microphone.
Step 3: Record the video
Click on the “Record” button to start recording your desired region, screen or window.
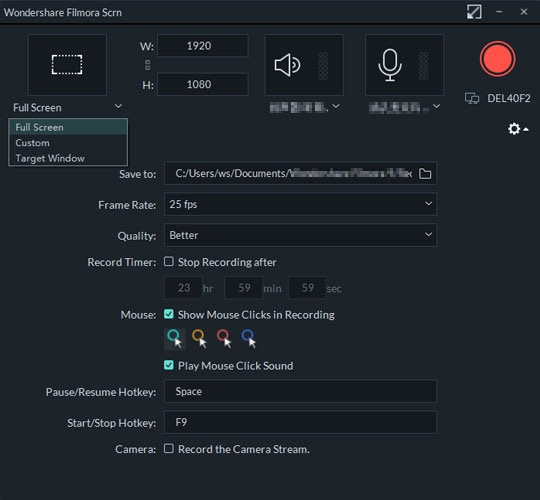
Step 4: Save your recording
When you are done with recording your video, you should hot the “Stop” button to stop recording and save your video. Aiseesoft will only save video as .WMV. If you want another encoding mode, you should use a video converter.


