A YouTube banner is an image (also known as a graphic, cover art, or wrapper) displayed on the main page of a YouTube Channel. It may also be used as thumbnails for all your videos. The banner needs to be high definition and follow some guidelines set by the staff members at Youtube.
For example: If you are a gaming channel, your banner should contain pictures or graphics related to the game/video you are uploading. Or, if you are a cooking channel, it can be an image related to food items.
So, one should be able to use the banner cleverly to get more likes and comments on their videos. Let's learn how to make a YouTube banner.
- Part 1. How to Make a YouTube Banner with Filmora
- Part 2. How to Make a YouTube Banner with Canva
- Part 3. How to Make a YouTube Banner with Adobe Creative Cloud Express
- Part 4. Keep these Guidelines in Your Mind before Starting
Part 1. How to make a YouTube Banner with Filmora
So, there must be a lot of ideas popping up in your mind to create the perfect banner for your YouTube channel. It's time to get started. The new update of Filmora is just phenomenal when it comes to video editing software. You can also create that perfect banner! It’s extremely easy and simple to use and contains numerous features, whether themes, stickers, or even YouTube Banner templates!
There are two ways to create that perfect YouTube banner with Filmora. The first is by choosing an intro template, which includes downloading it, a little bit of editing for your customized banner, and you’re good to go to upload it on your YouTube channel. The second is making your YouTube banner with different images, elements, and titles; edit it a bit, and you’re good to go! We have prepared a step-by-step guide for you to make it even easier!
Here's a Step-By-Step Guide on Making a Youtube Banner with Filmora
1. Create YouTube Intro by Choosing a Template
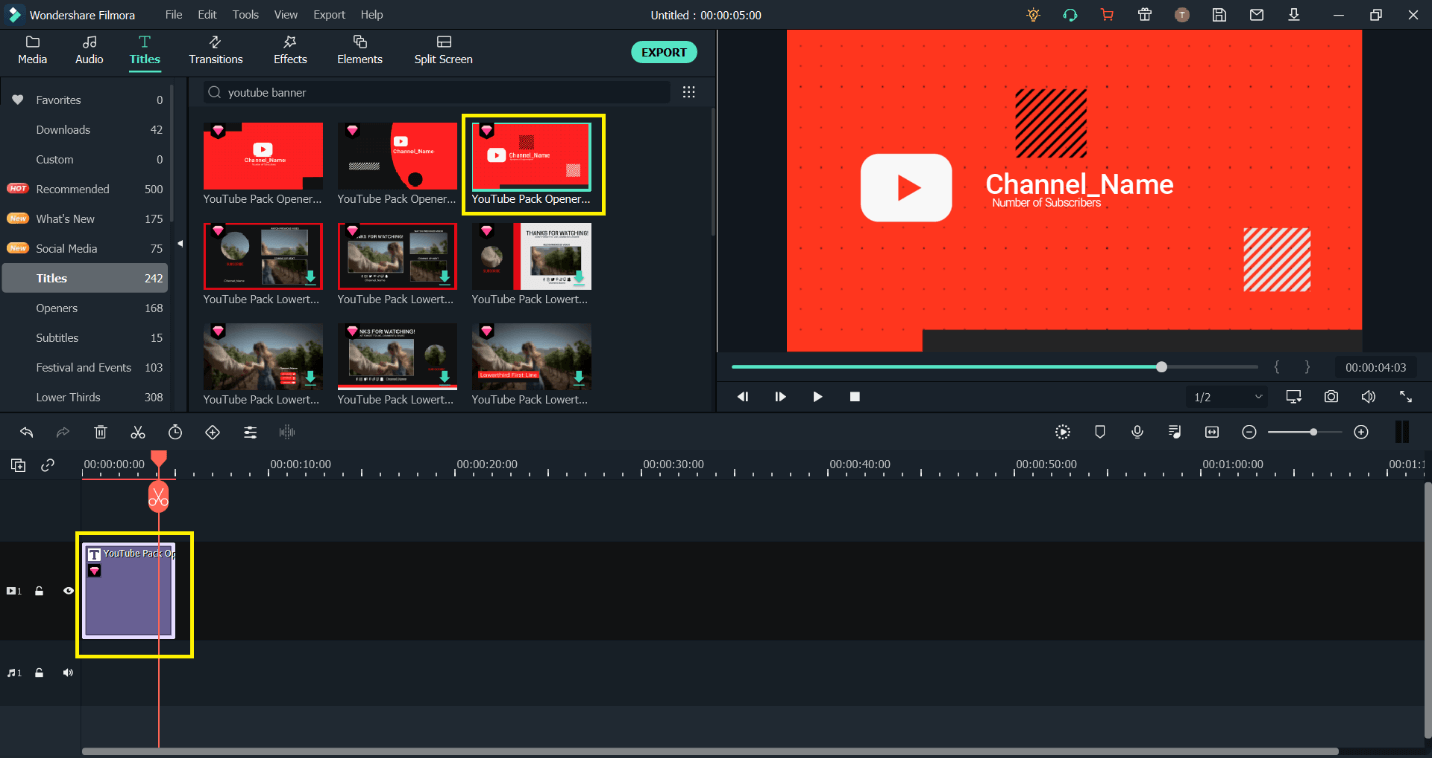
Step 1: Choose a template from Wondershare Filmstock
The first step is to choose a template from the outstanding Filmstock where you can discover abundant royalty images, videos, templates, and more! Your channel might be about Beauty, Gaming, Travel, Lifestyle, or anything! Choose the template that goes with the theme of your channel, and download that and open it in Photoshop or Filmora.
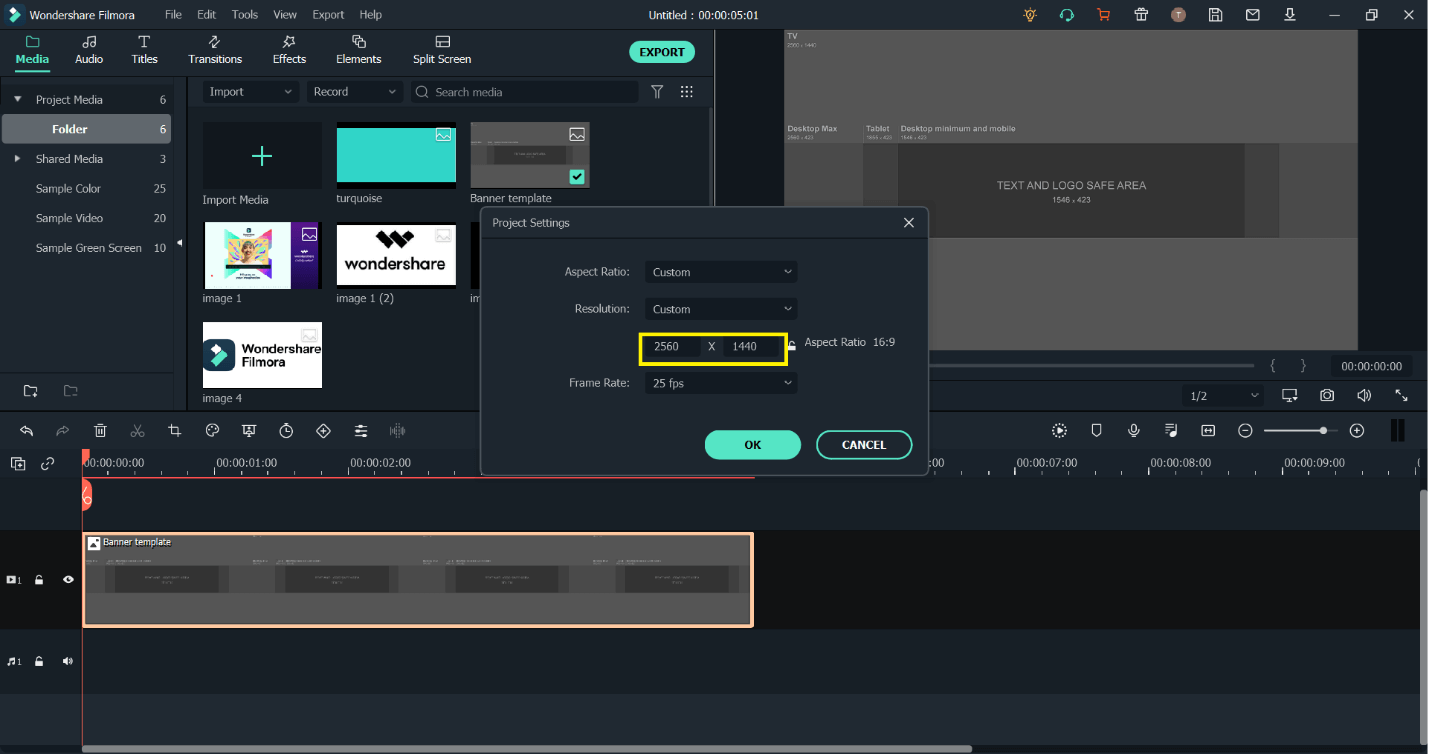
Remember the dimension must be 2550x1440, and the maximum file size should be 6 Mb. You can also change it in the project settings in the file tab.
Step 2: Edit the Template Banner
Once you’re done downloading the banner, it's time to customize it with your YouTube channel’s name and add more spark to it. To do this, double click on the title to edit it, add your channel’s name. You can also format it any way you like.
Next is to add filters, images, and elements. Add any image or your own image to the banner. Now add elements such as arrows for “Subscribe” or “Follow me,” or any element you like. Be as creative as you can be!
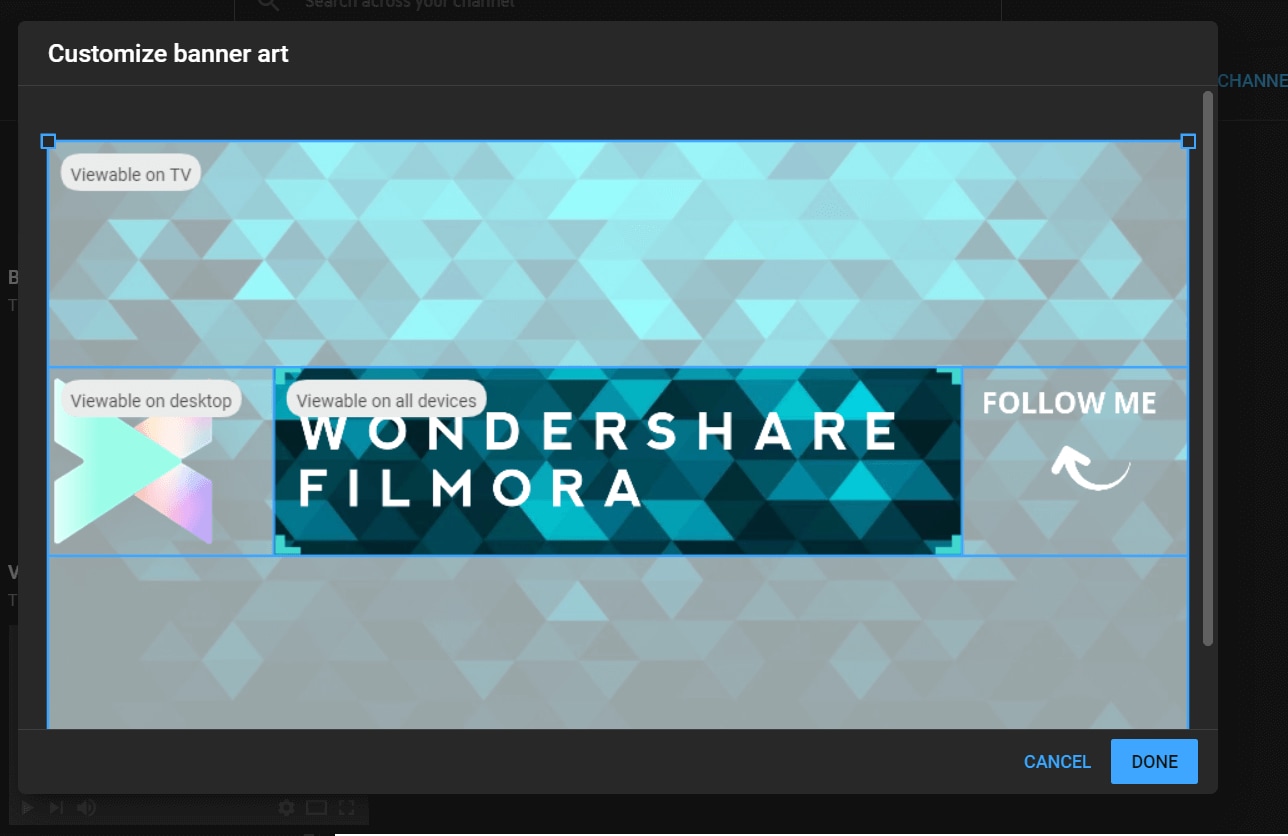
Make sure to keep the images and text inside the banner length as it’ll be viewed differently from TV, Mobile Phone, and Laptop.
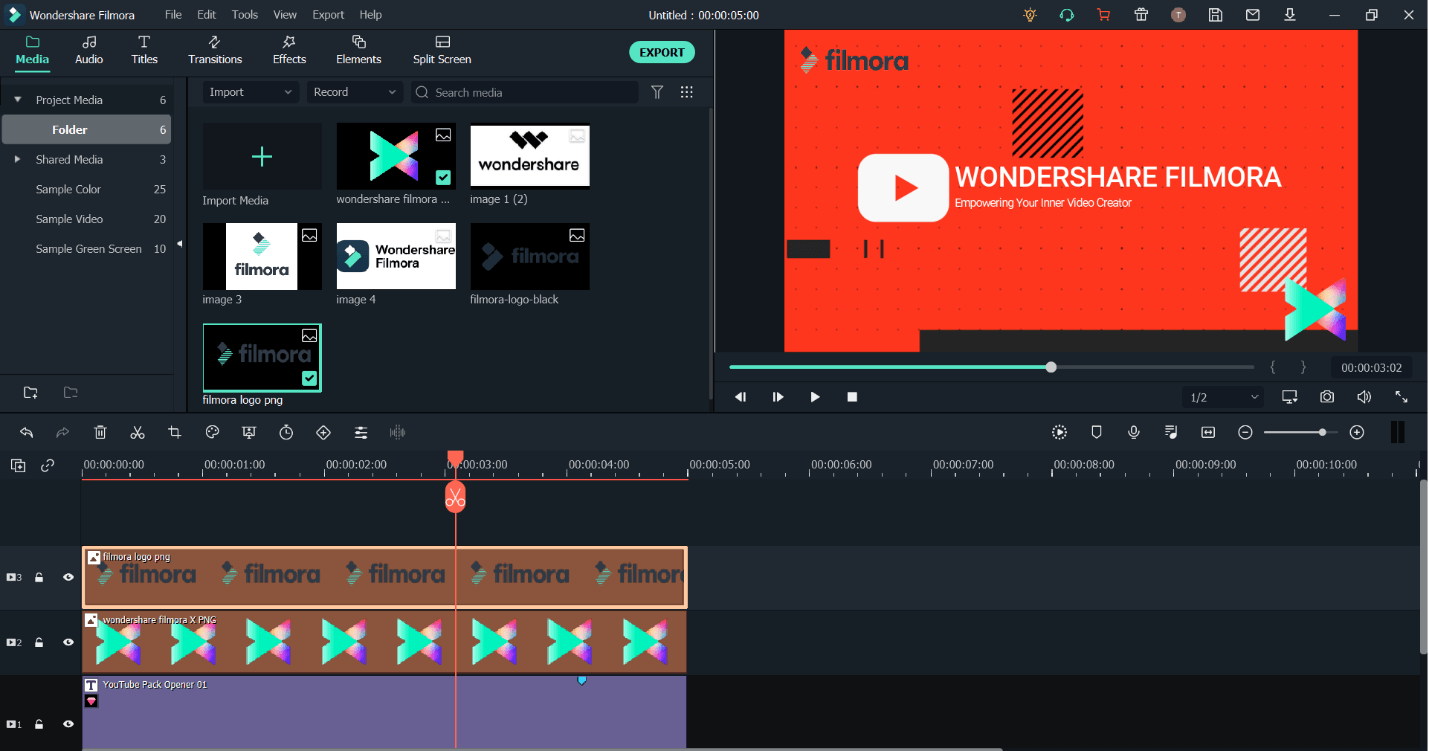
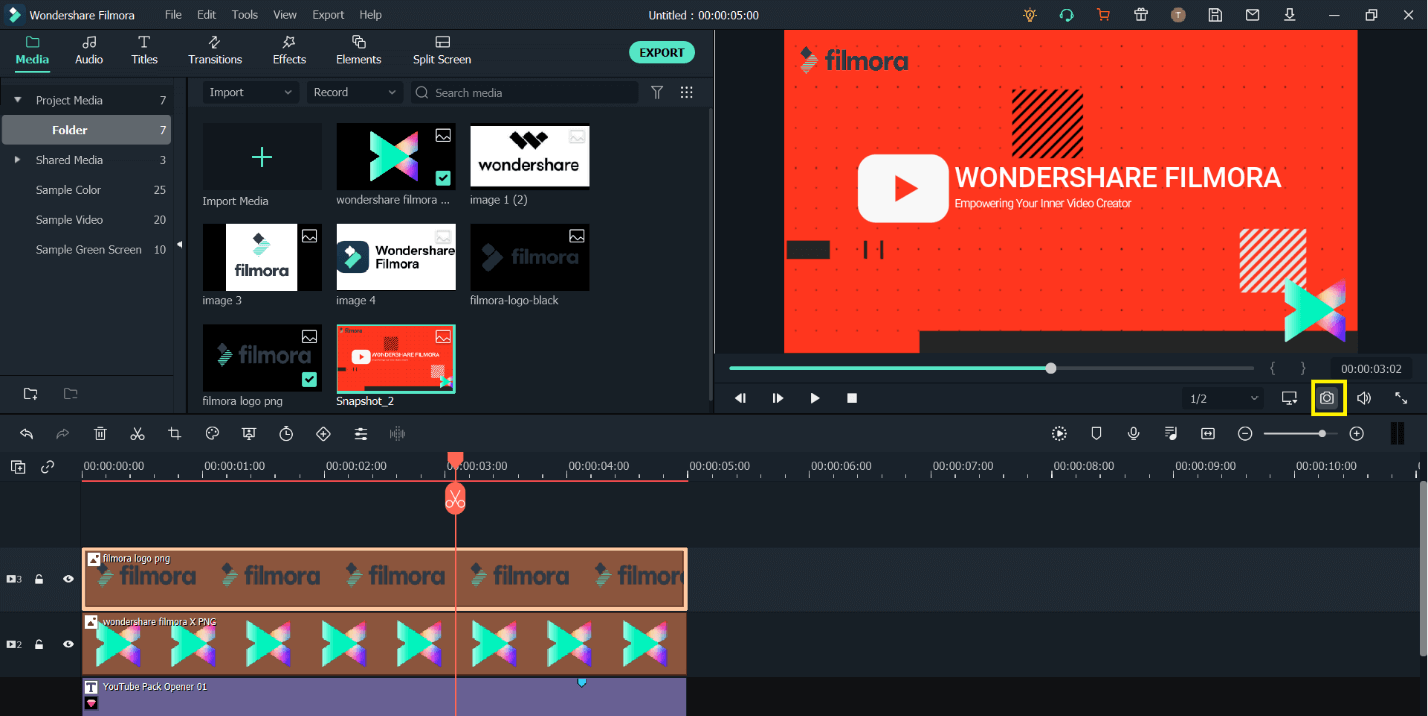
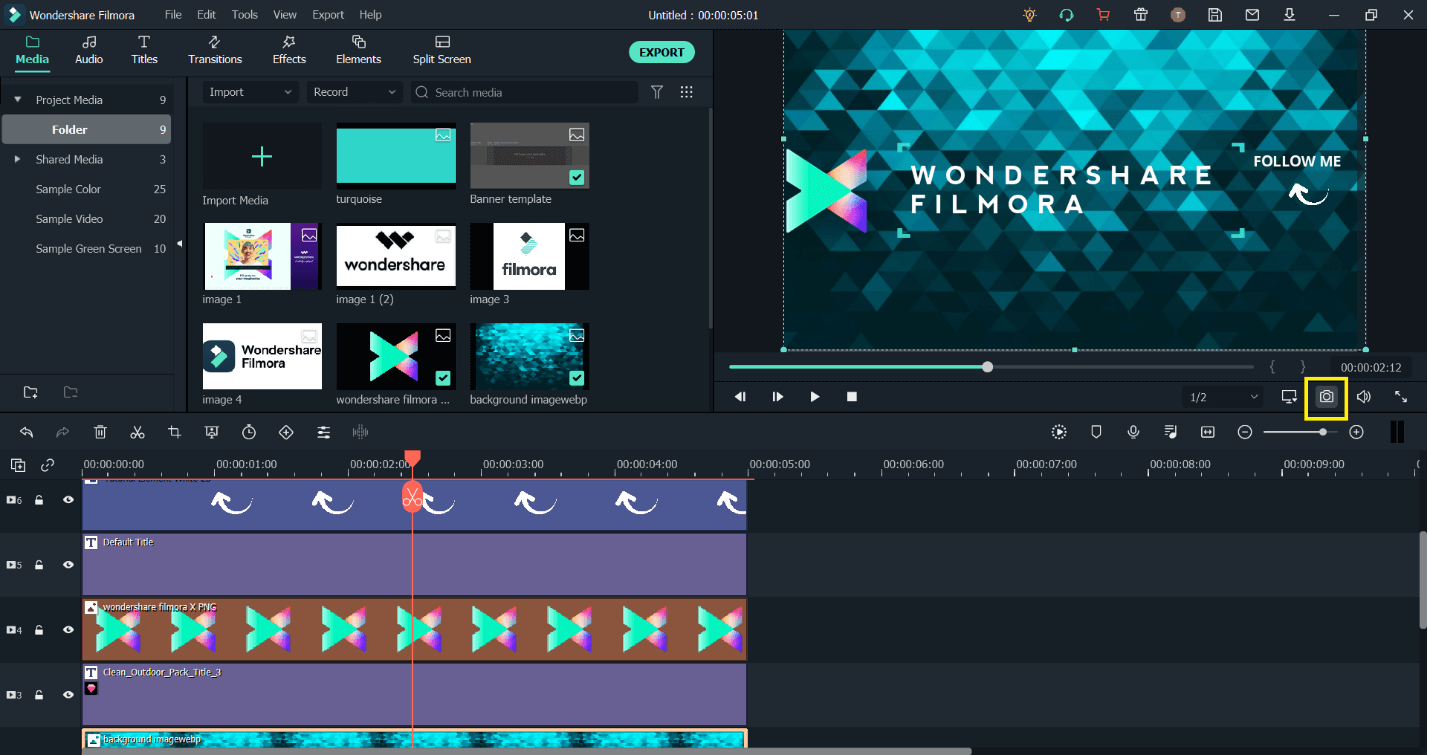
Now, all you have to do is take a snapshot of your banner by clicking on the camera icon below the preview pane. This will save your banner in an image format. The image will be saved in a specific location where program files of Filmora are saved, so make sure to check where it is saved.
Lastly, go to your YouTube channel and click on customize channel, then go to customization and further branding, find YouTube Channel Banner and upload your banner, publish it and you’re done! Super simple, wasn’t it?
2. Create Your Unique YouTube Banner using a Blank Canvas
Do you want to add more personality to your YouTube banner? Maybe spice up things a little bit? How about you create your own banner from scratch and create your unique look! Let’s get to it!
Step 1. Download the YouTube Recommended Template image
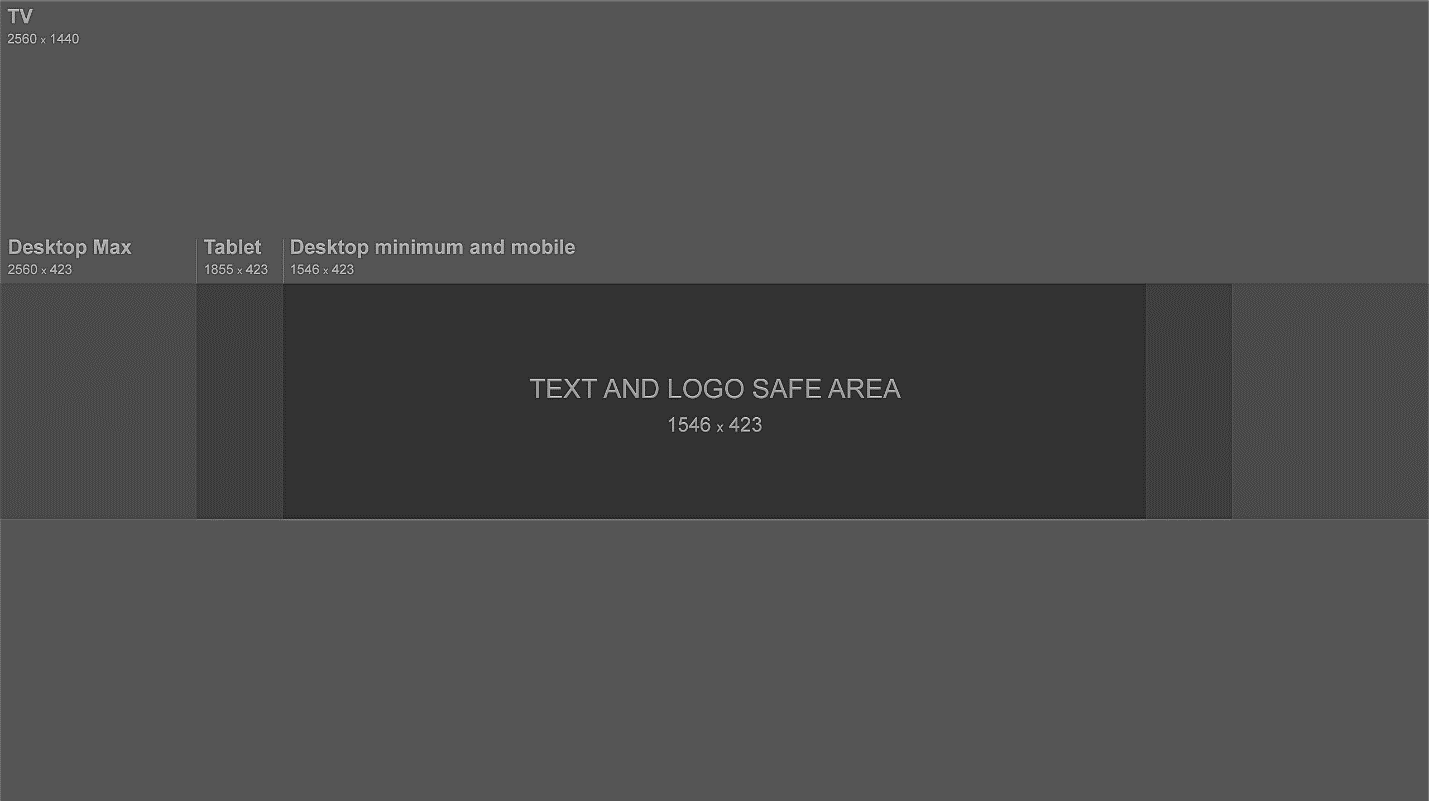
First, go to your channel and click on customize, click the link mentioned, scroll down a bit and find the template image with the YouTube Banner Dimensions mentioned. Download that and import it to Filmora to start working on it. Or you can simply type, YouTube banner template and download it.
Step 2. Import the images, titles, elements etc.
Open Filmora and add a new project. Import all the images you want to add to your banner. For this, click on media and then import, choose your desired images, and hit open; Filmora will import them.
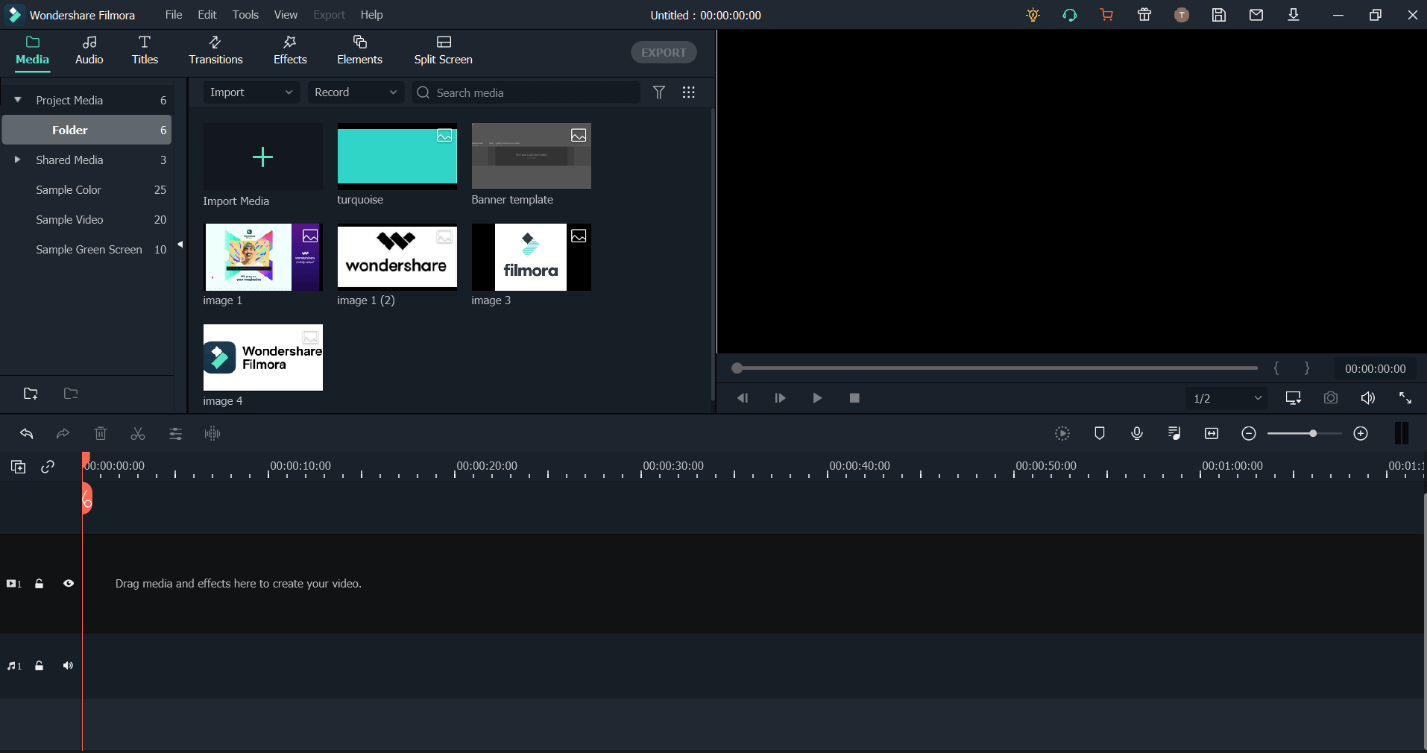
Next, change the project settings to 2560x1440 by clicking on File and then Project Settings. Now select them and drag them to the timeline how you want them to start working on it.
Step 3. Add Images, Title, Elements
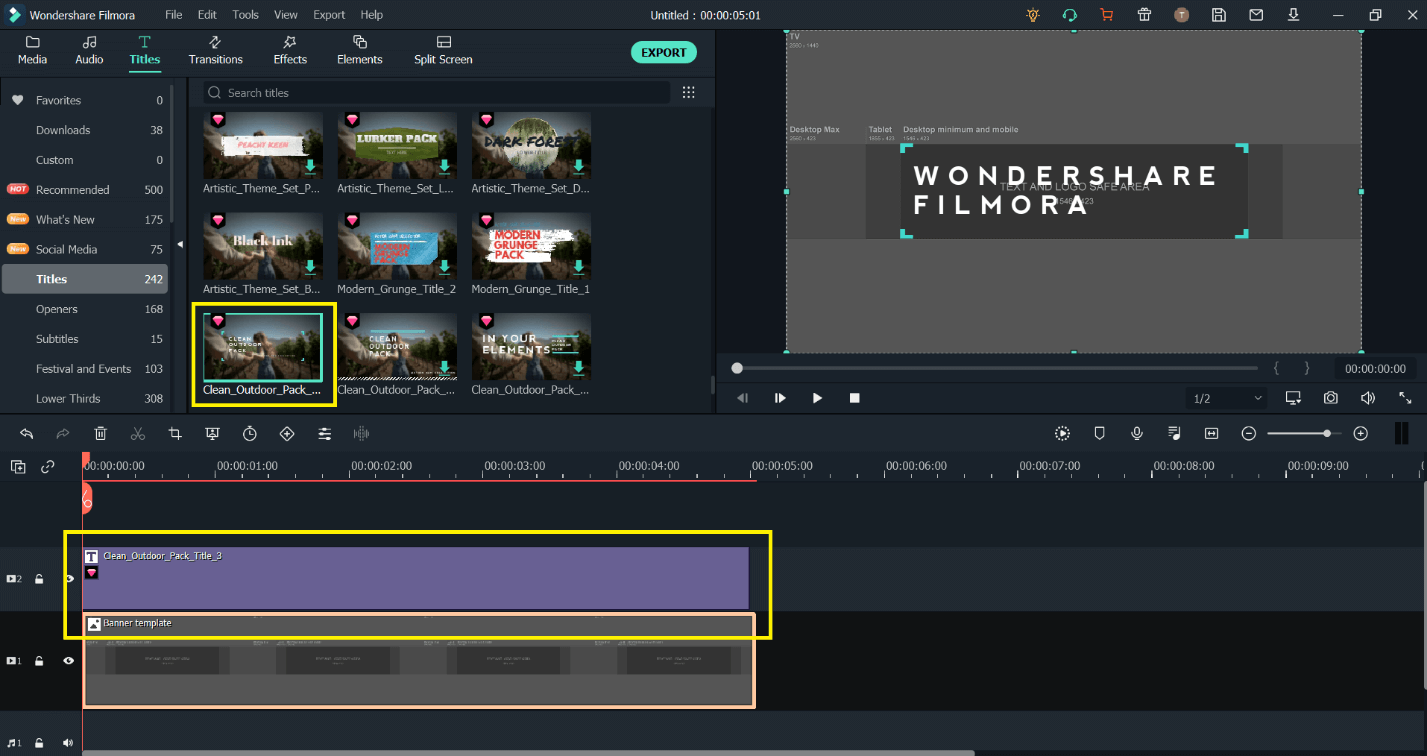
Choose a title for your YouTube banner by clicking on the Title tab, and drag and drop it to the timeline. Now double click to edit and add your YouTube channel’s name to it.
Next, choose the elements you want to add and drag them to the timeline on a video track above one another and place them on the banner, adjusting their size and orientation.
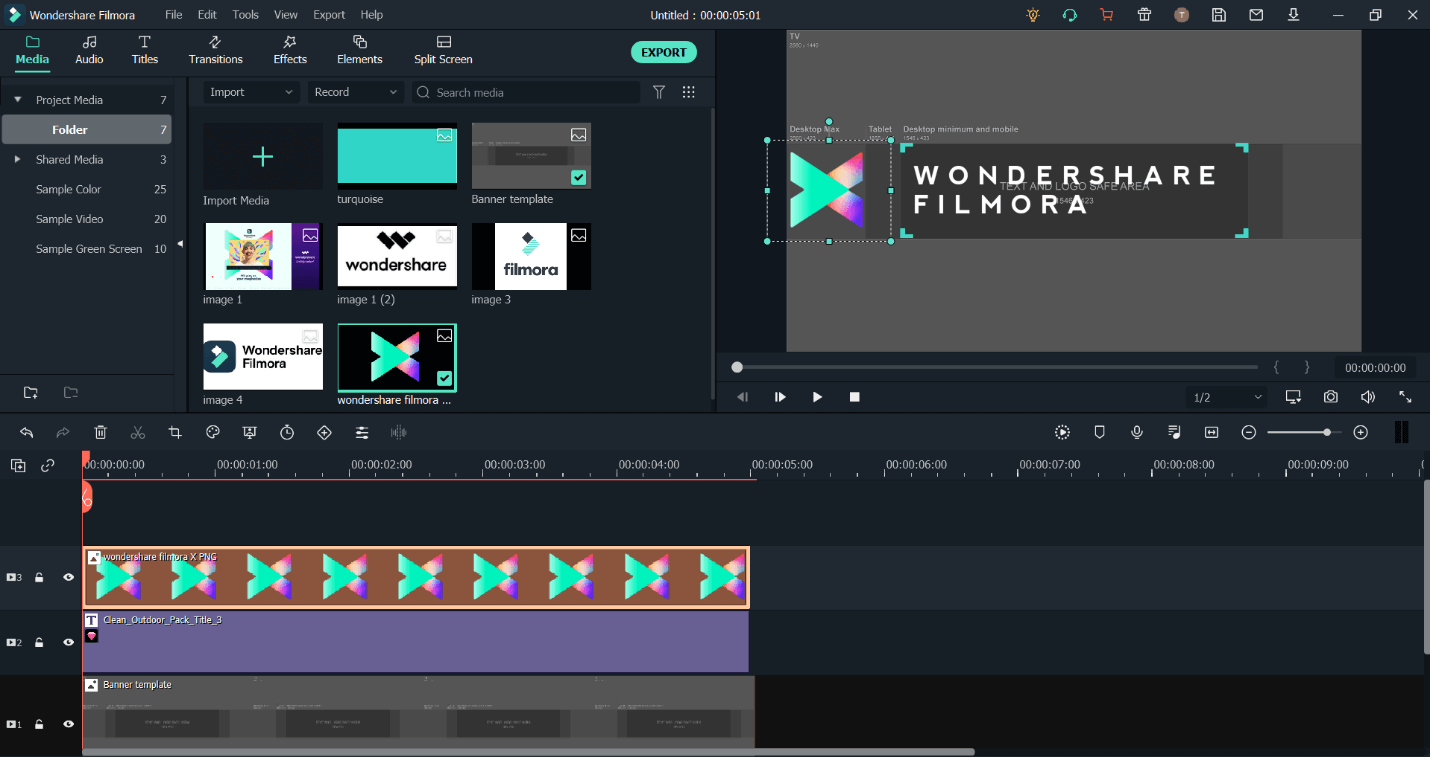
Again, make sure everything stays inside the banner dimensions as it will appear differently on different devices. Lastly, add a background image for your channel on a video track above the template image, which will appear the same for all devices.
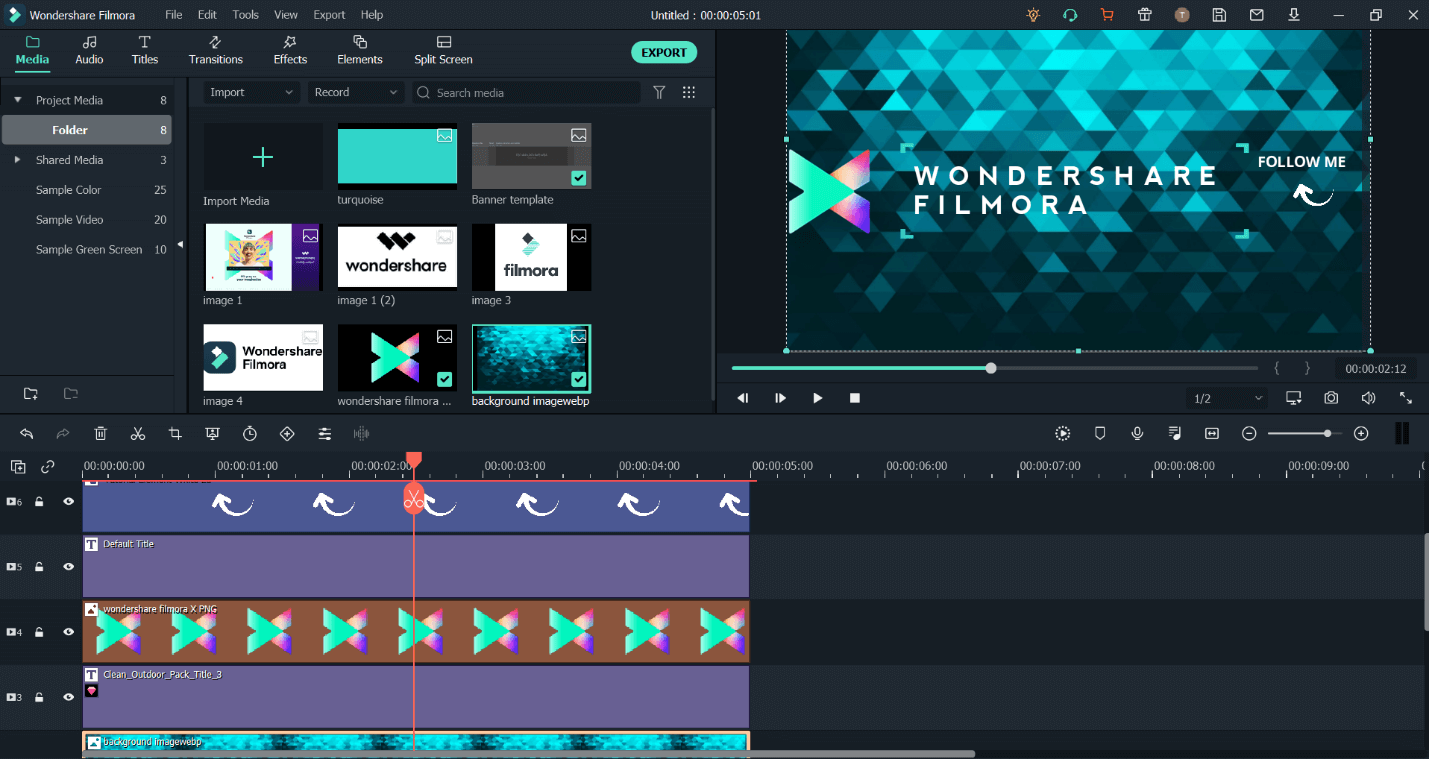
Step 4. Take a Snapshot and Add it to Your YouTube Channel
Now, all you have to do is take a snapshot of your YouTube banner by clicking on the camera icon just below the preview pane. This will download or save your banner in an image format. The image will be saved in a specific location where program files of Filmora are saved, so make sure to check where it is saved.
Finally, go to your YouTube channel and click on customize channel, then customization, and go to branding. Now find YouTube Channel Banner and upload your banner, and hit Publish. You’re all done! Now your YouTube channel has its very own unique banner!
Part 2. How to Make a YouTube Banner with Canva
Canva is another very popular online tool and banner maker for making great looking images, including YouTube banner designs.
For free, Canva provides its users with a plethora of customizations and templates to create many different types of images and designs.
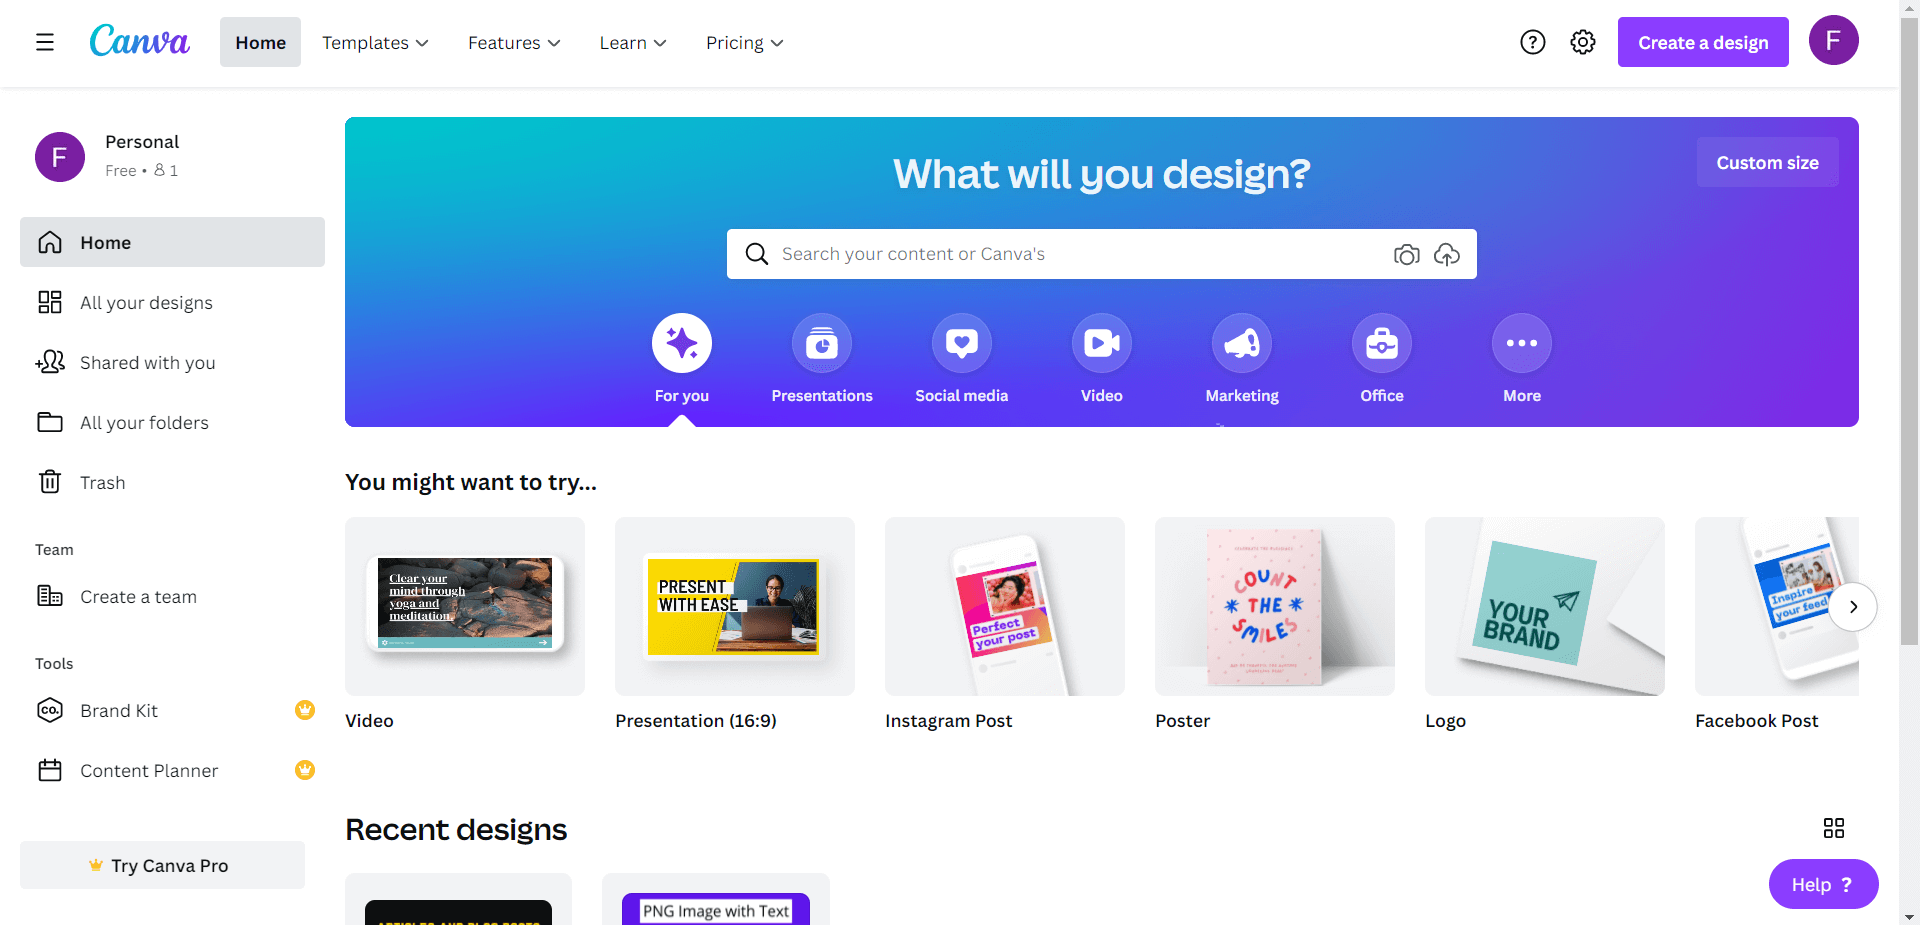
When you open Canva, you will see the extensive options and choices to create different types of graphic designs.
Step 1. Open Canva
On the main blue colored control panel, you will see an icon labeled as “Social Media”. Click on this icon to open further options to create social media graphic art. From the list, find the icon titled “YouTube Channel Art” and click on it to select it.
Step 2. Choose a template
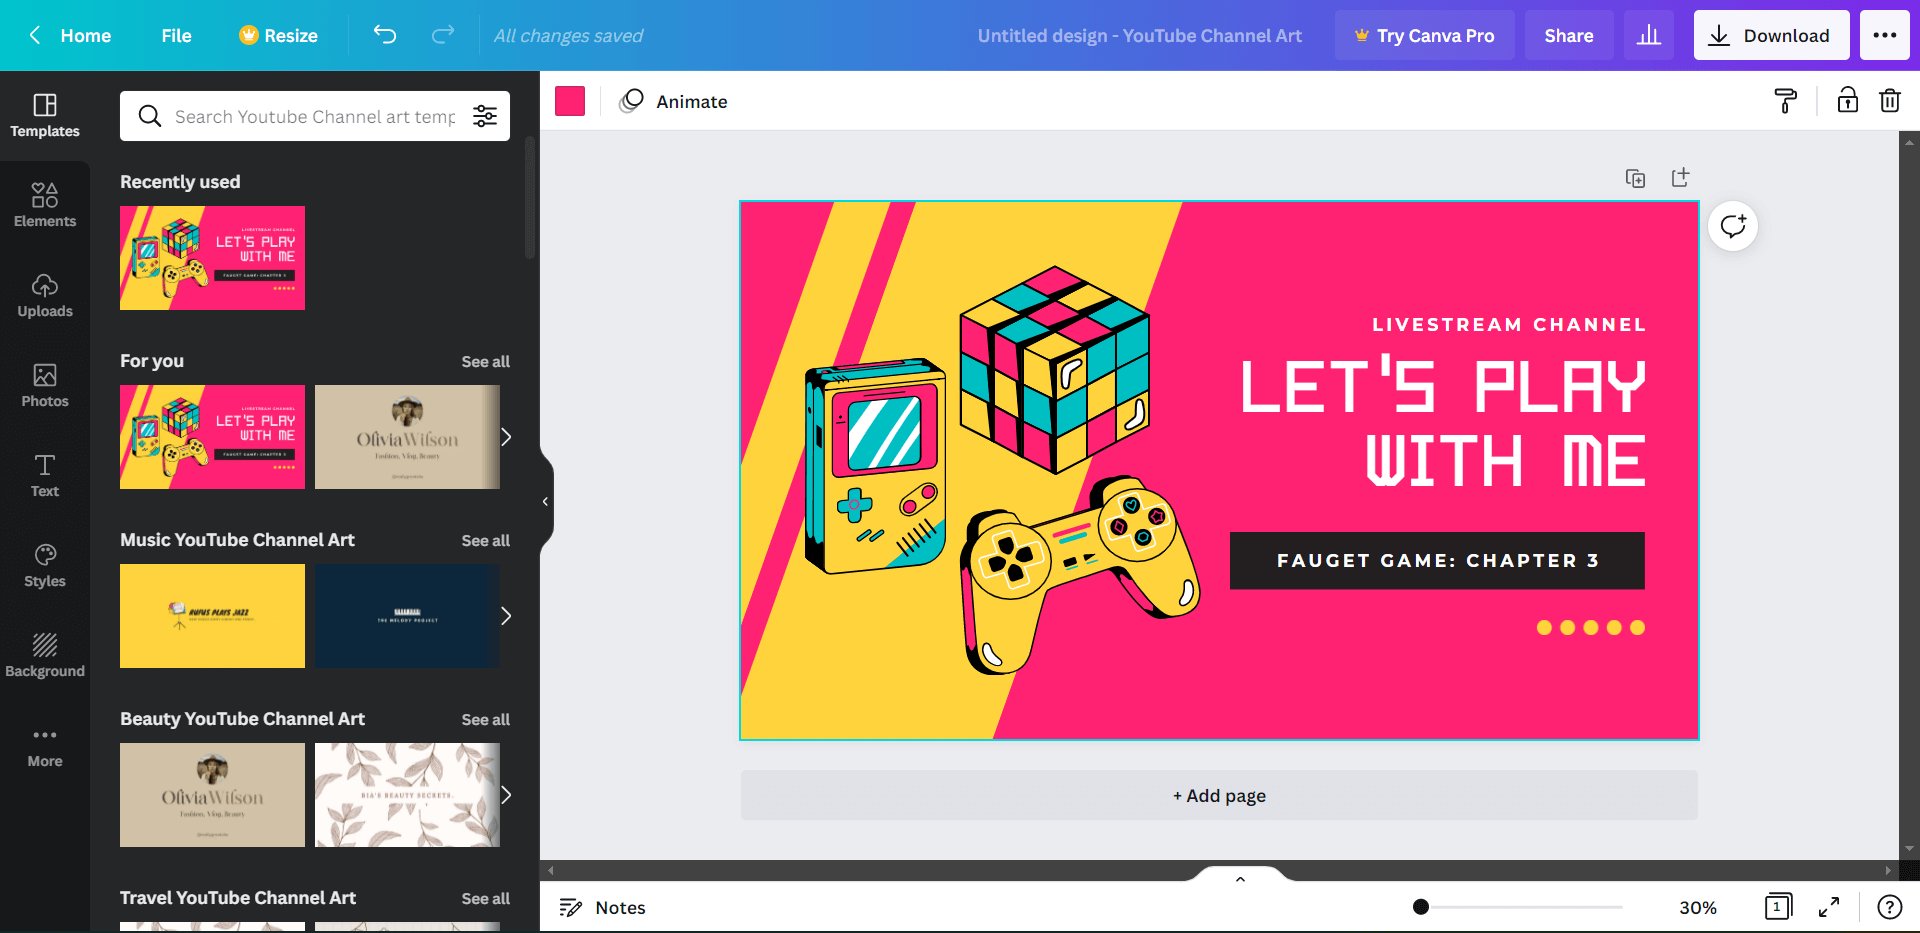
Once you click on the “YouTube channel art”, Canva will open another tab in your browser that opens the main customization user panel. Also, the list of templates under the category of “YouTube channel art” will be displayed on the left hand side of your screen.
From the list, choose the template that you want to use for your YouTube banner design and simply click on it - it will now be loaded on the main canvas ready for editing.
Step 3. Customize the image
These templates are completely customizable - that means you can edit the text, design, pictures and almost everything about the banner template. To edit any item, like an image, all you need to do is simply click on it. You will see image related setting on the horizontal bar just above the canvas.
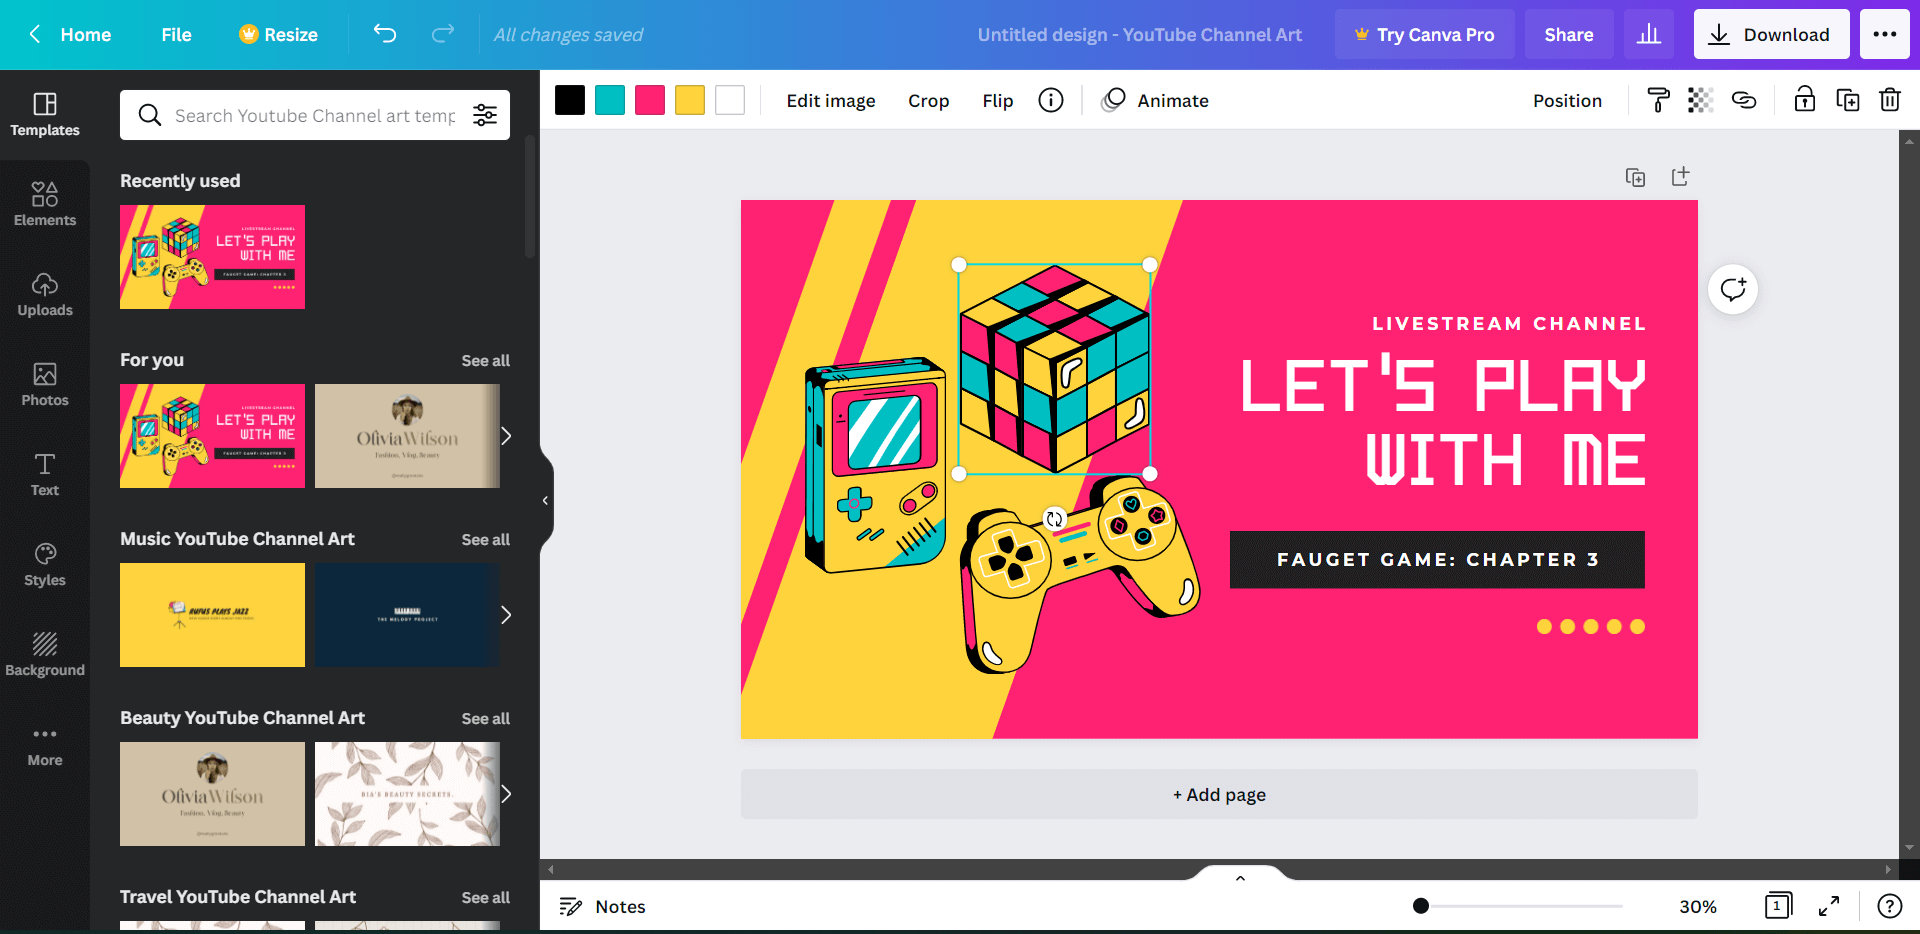
From this panel, you can change the colors of the image, crop or flip its orientation and also add some basic animations to it.
Step 4. Customize text
Similarly, to change the text boxes in your template, again just click on it to see that the set of options on the top bar will now change to those relevant to the text.
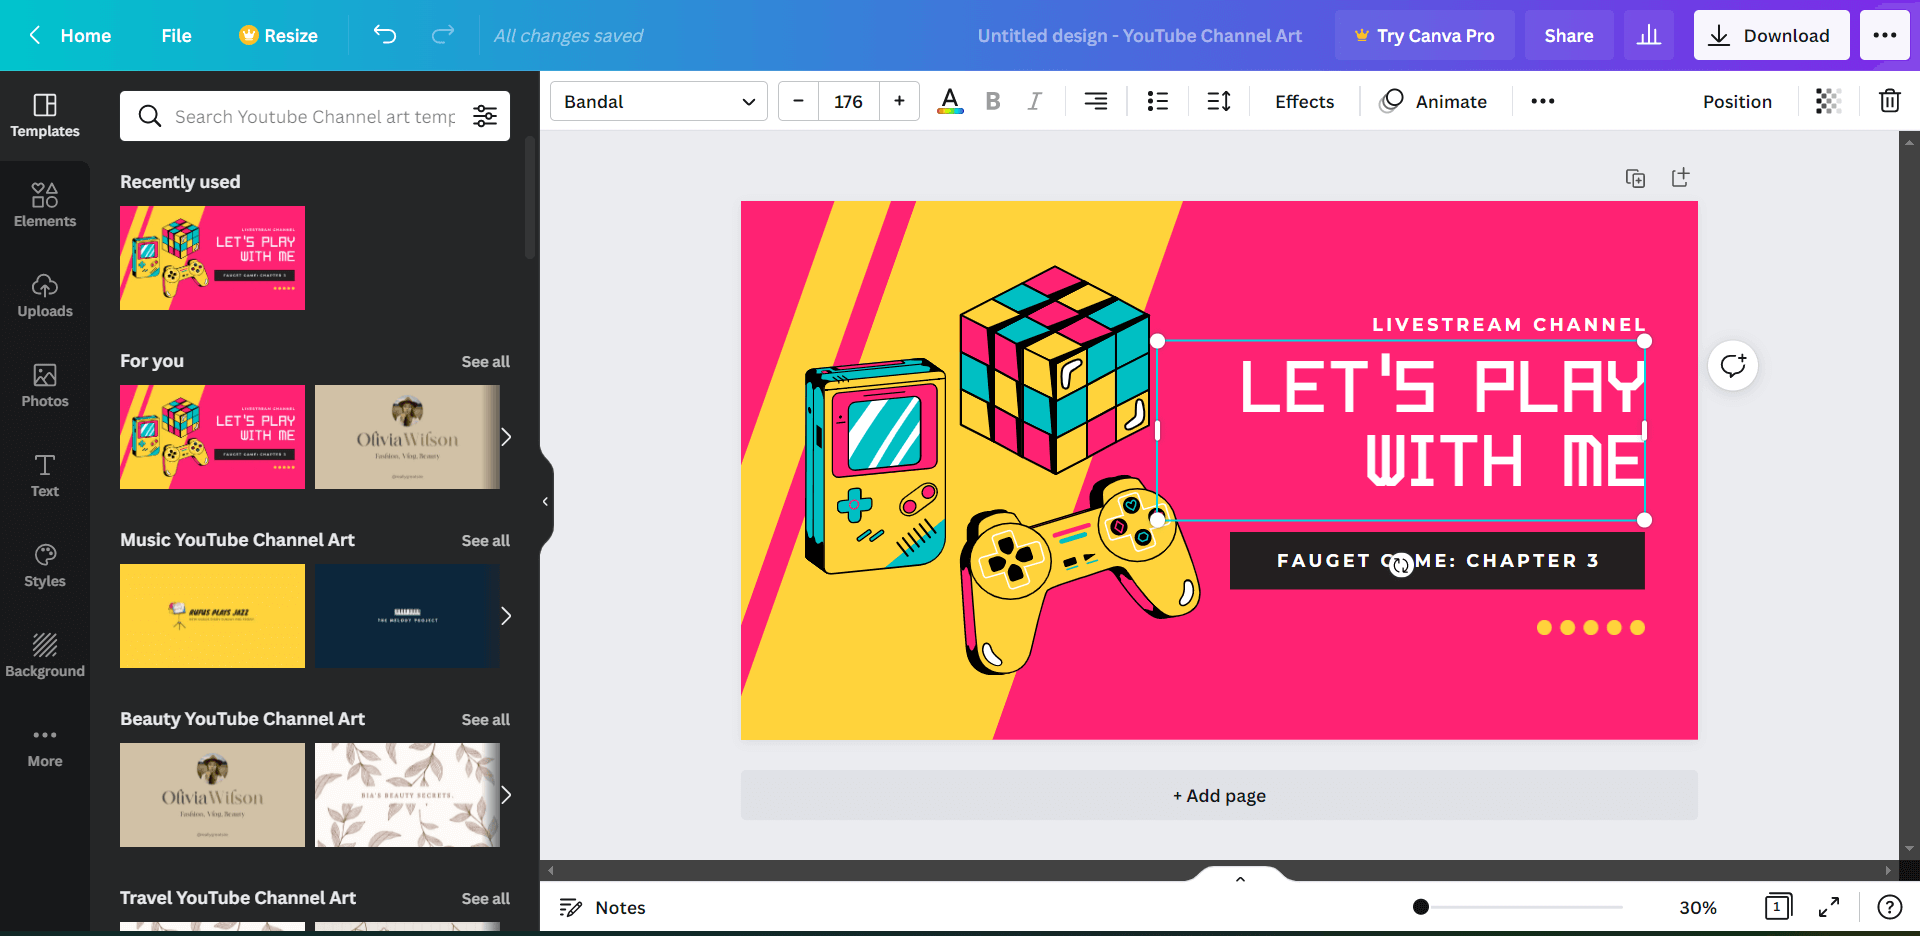
From these settings, you can change the font size or font style; add various text effects, change paragraph style and some other basic functions.
Step 5. Download the YouTube Banner
Once you are satisfied with the changes in your YouTube banner design, you can save it on your PC by selecting the “Download” button at the top right-hand side of your main window. After you click on it, it will drop down a list of options for downloading.
Insert canva-youtube-channel-art-download
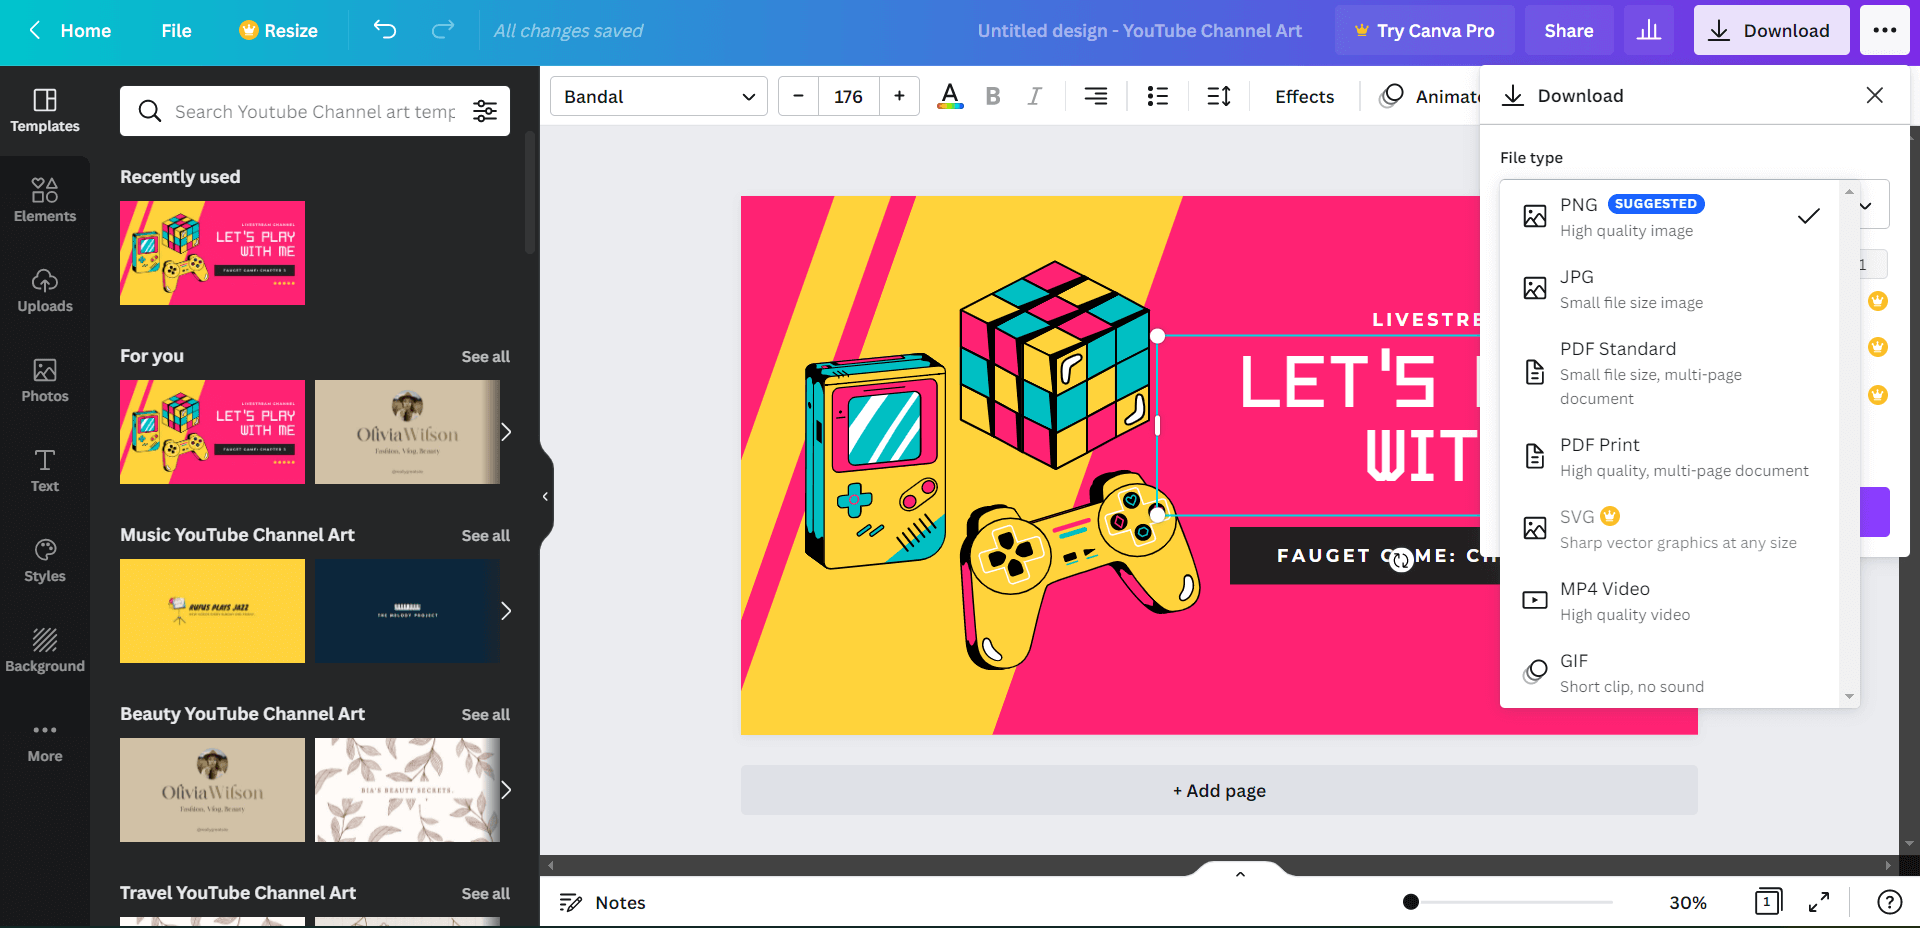
Apart from the standard file formats for saving like PNG, PDF and JPG, Canva also gives you the ability to save your output as an MP4 video file (suitable for projects with animations) and Sharp vector graphics (for professional-level editing).
There are also other YouTube banner makers and manual ways to design your own YouTube banner - but Canva and Adobe Creative Cloud are usually the more popular choices because of their good collection of free templates and ease of use.
Part 3. How to Make a YouTube Banner with Adobe Creative Cloud Express
You might remember Adobe Spark which was the online banner maker by Adobe. It has now been replaced with the newer and more powerful Adobe Creative Cloud Express. It is available as a mobile app and desktop software, along with a web interface.
Step 1. Open Adobe Creative Cloud Express
It is fairly simple to make YouTube banner designs in Adobe Creative Cloud Express due to the large number of free templates that it provides. All you need to do is log in to Adobe Creative Cloud Express and you will be taken to the home page, where all these templates are present.
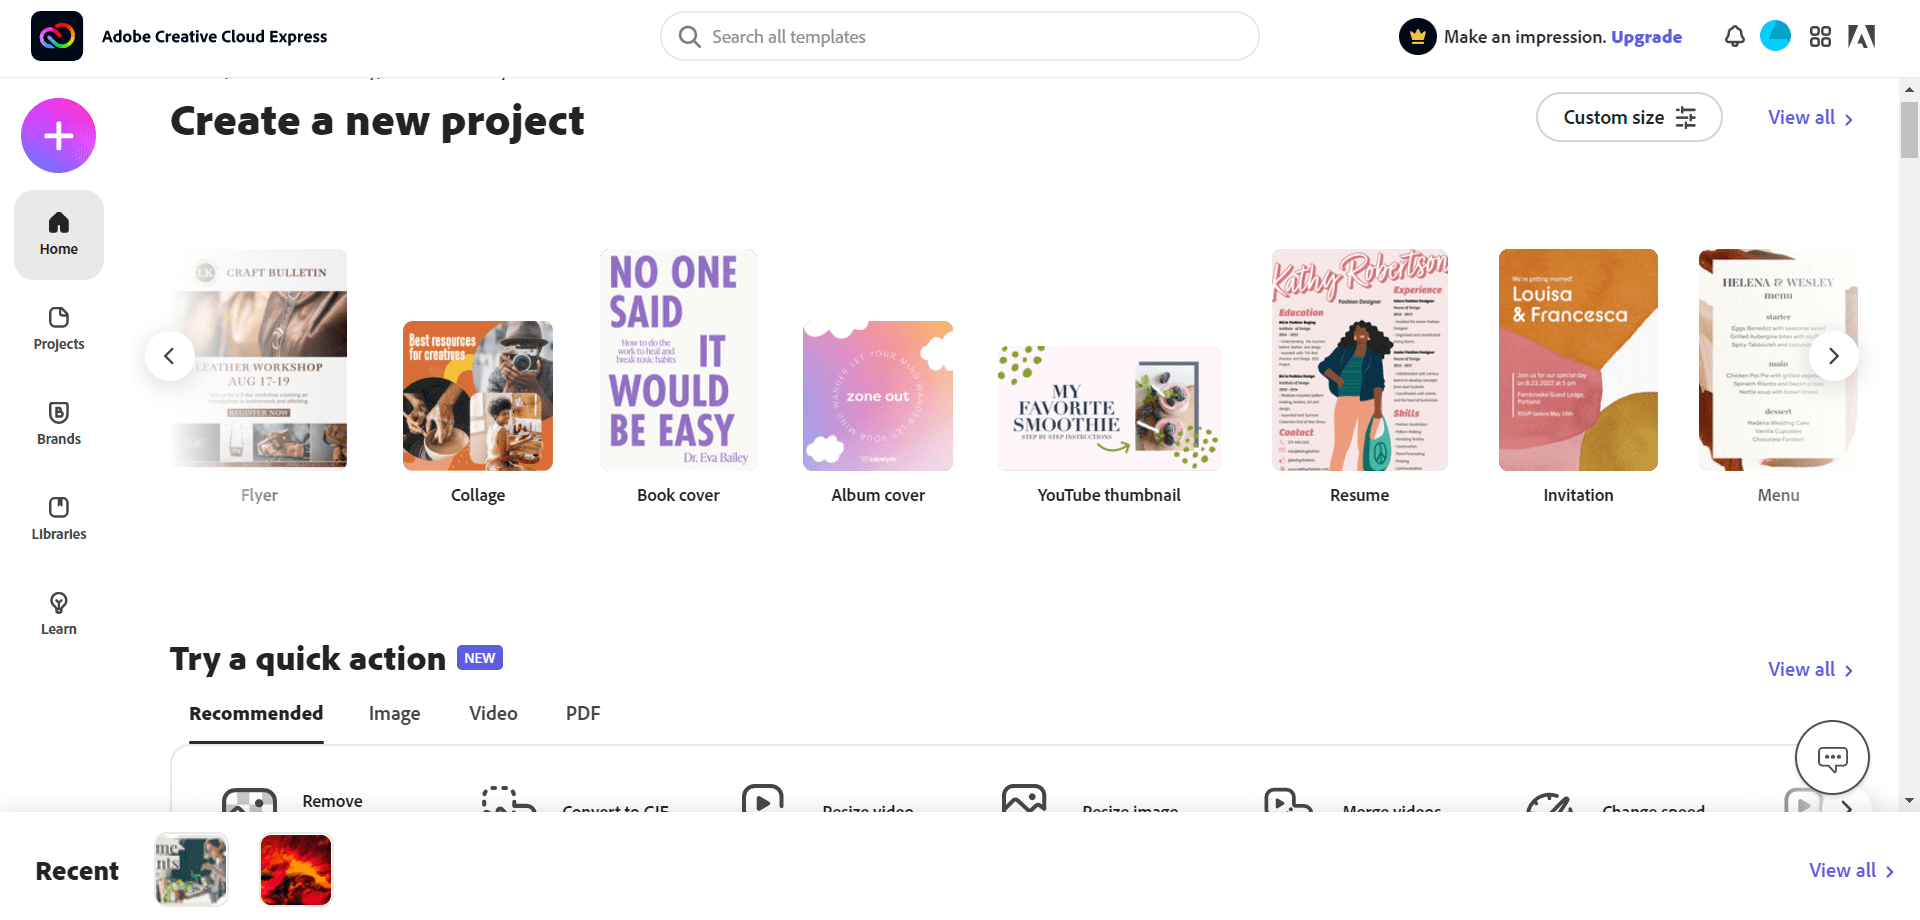
From the list of the templates, select the collection labeled as “YouTube Thumbnail” and click on it to open its content.
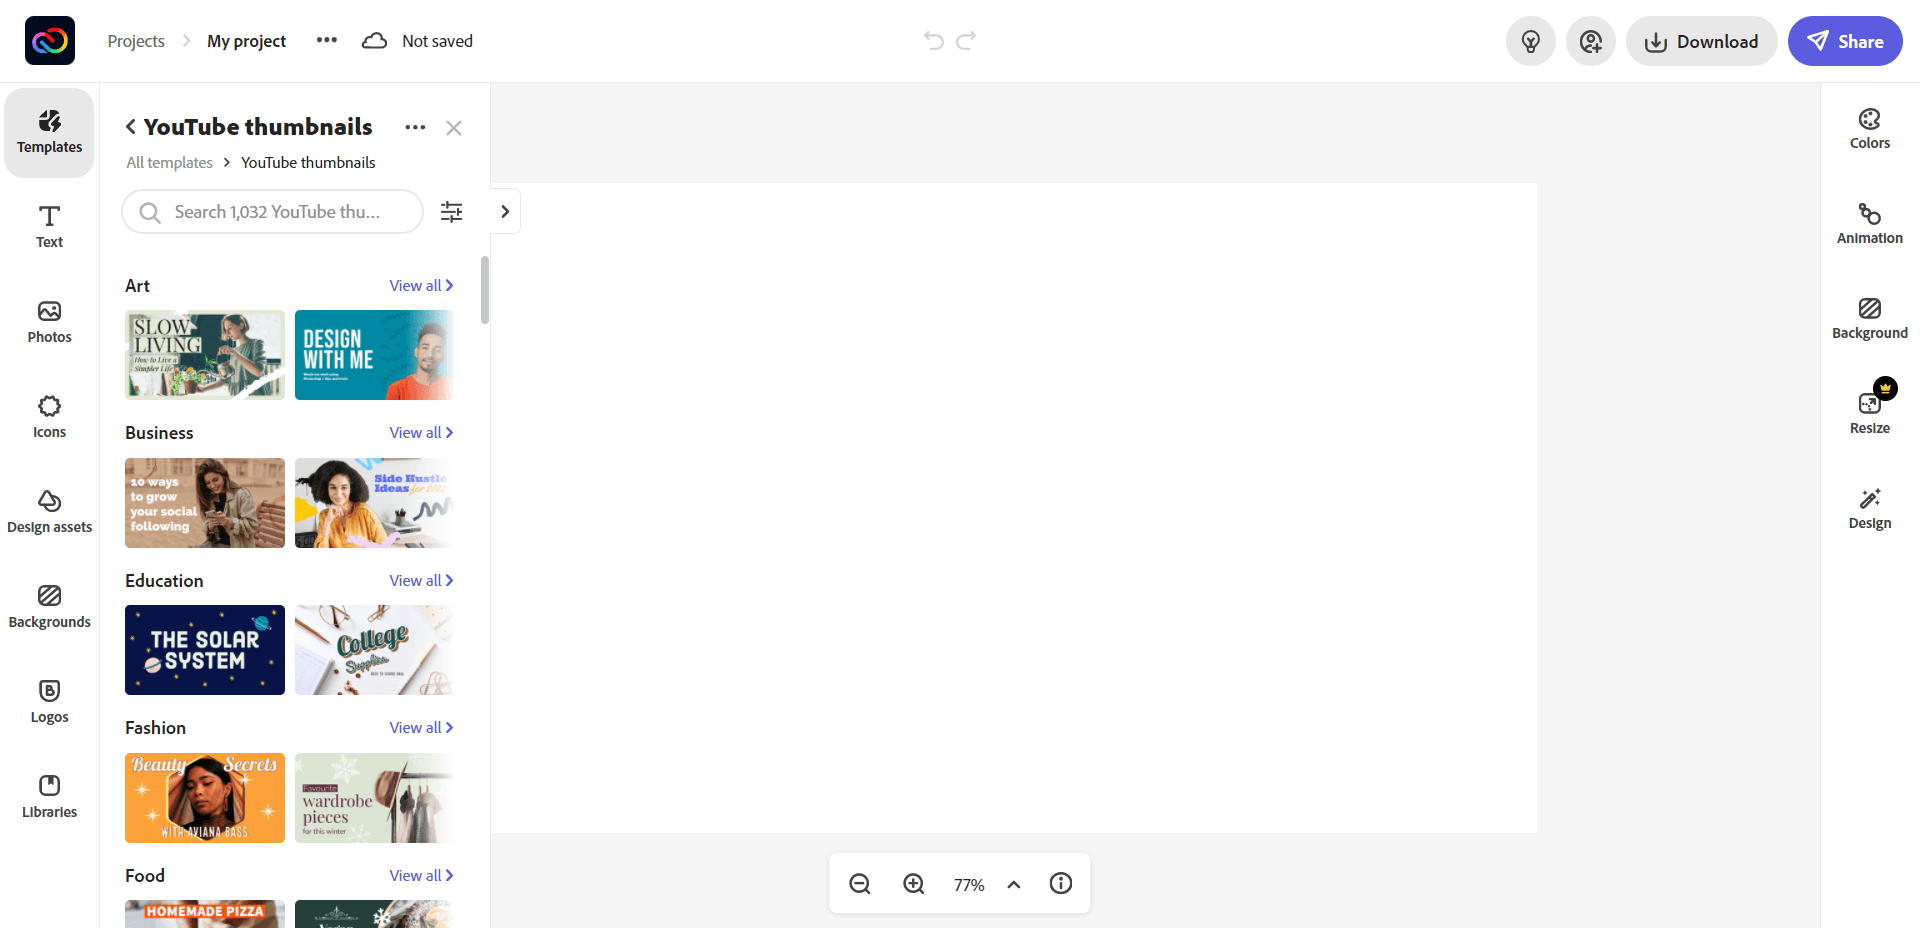
Step 2. Choose a template
Once you click on it, you will be redirected to the main working interface of Adobe Creative Cloud and the YouTube banner design templates will be opened as a tan on the left of your window. Click on any template to start working on it.
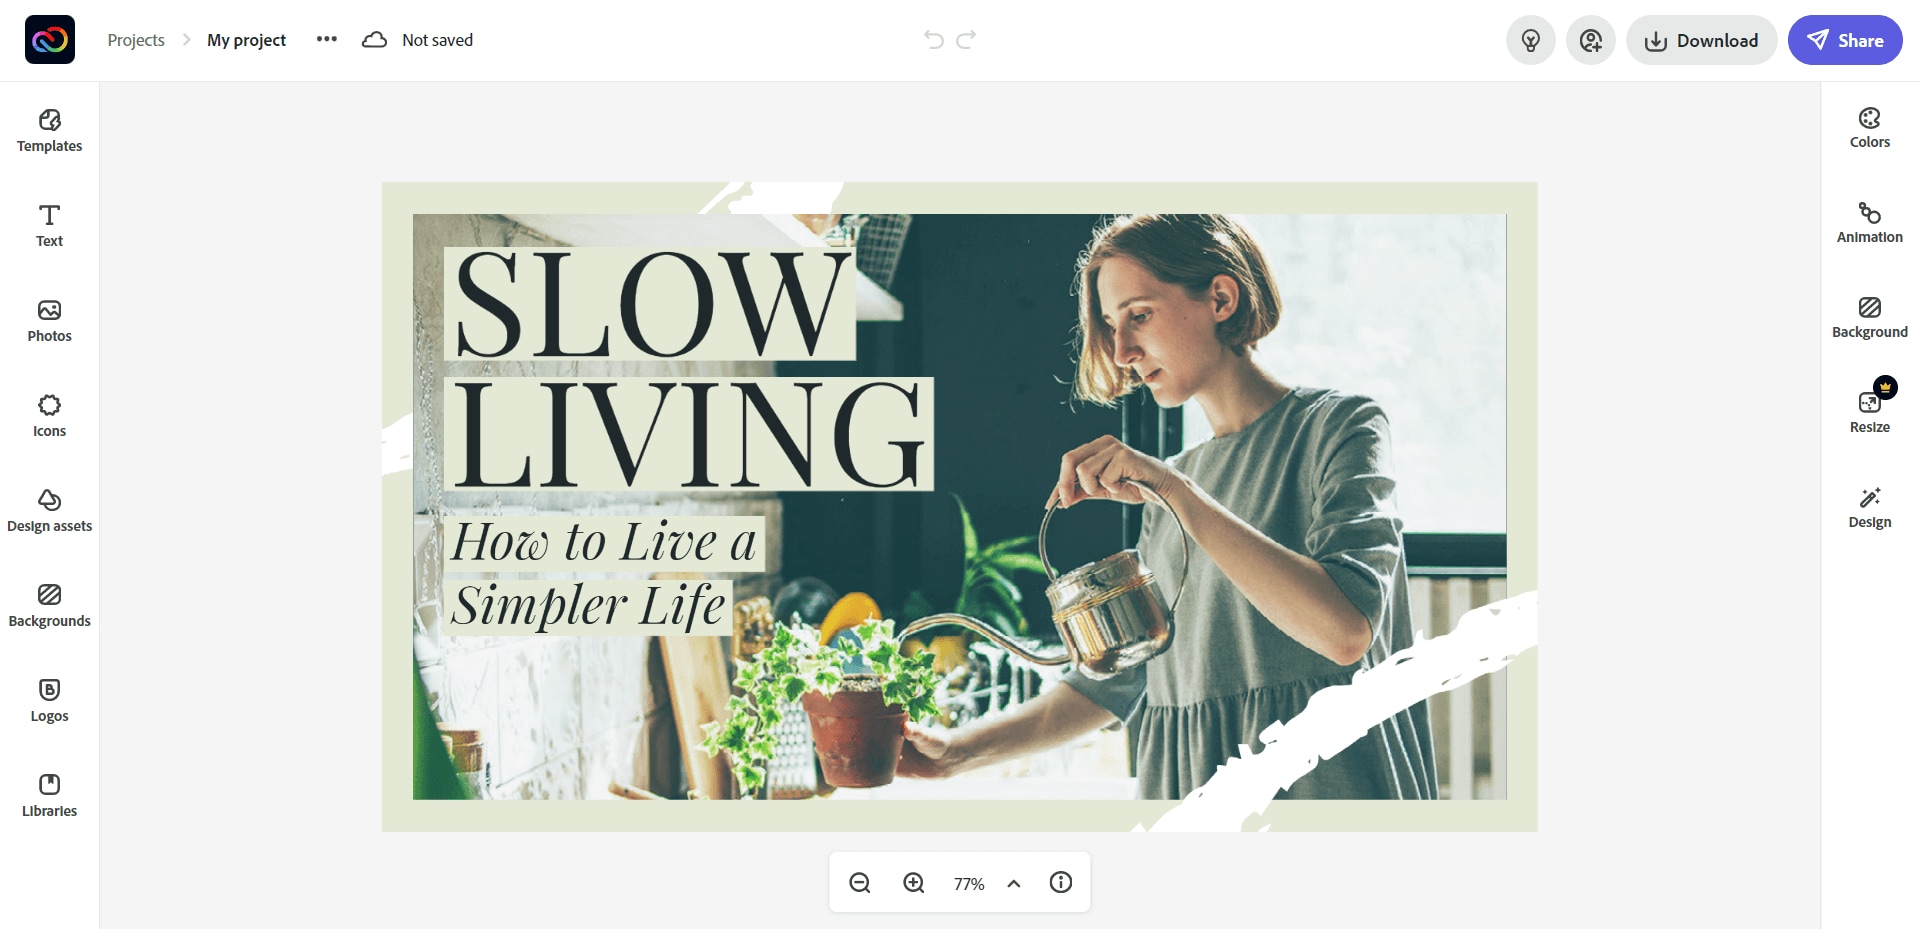
Step 3. Customize your text
Once the template is loaded on the main canvas, you can try clicking its various parts and you will notice that it is entirely customizable. As you click on any one of the text boxes, further options will open as a tab on the right-hand side of your window.
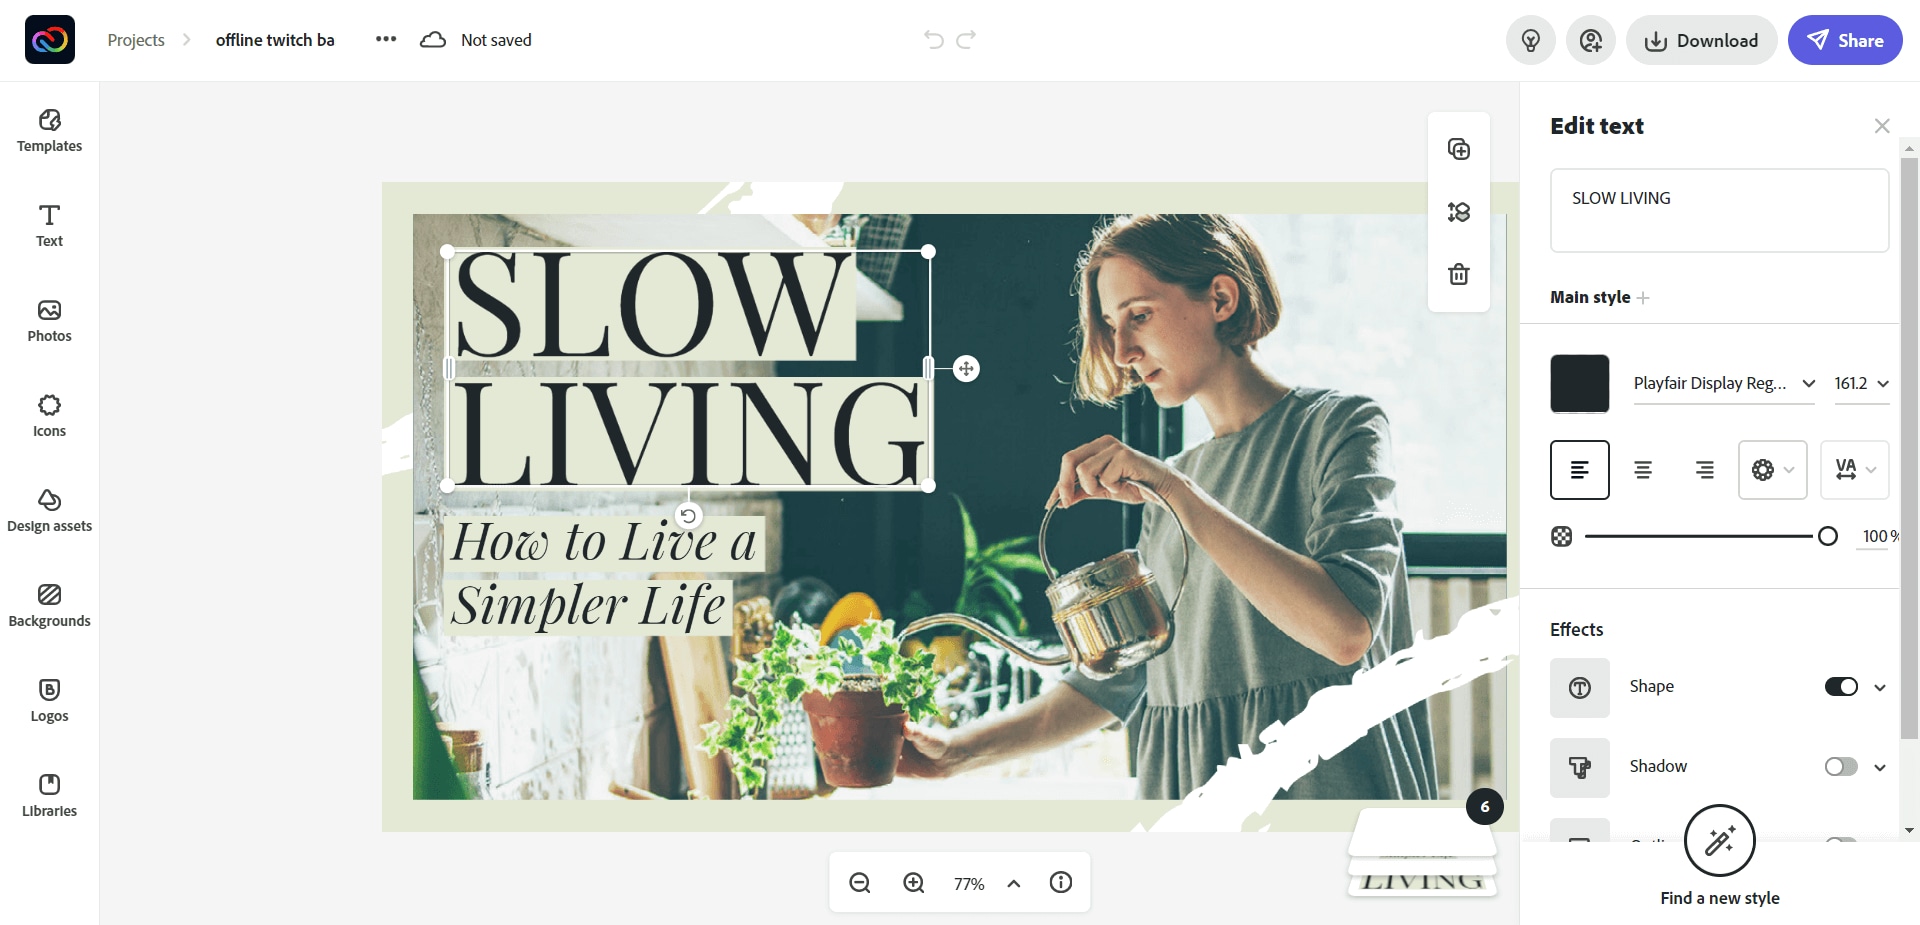
From here, you can change the properties of the selected text box - which includes, changing the text, fonts, colors, text effects and other customizations.
Step 4. Customize your image
Likewise, for images, you can also use a set of customizations. Just click on the background image and you will notice that the set of options on the right-hand side of your screen will change to settings pertinent to an image.
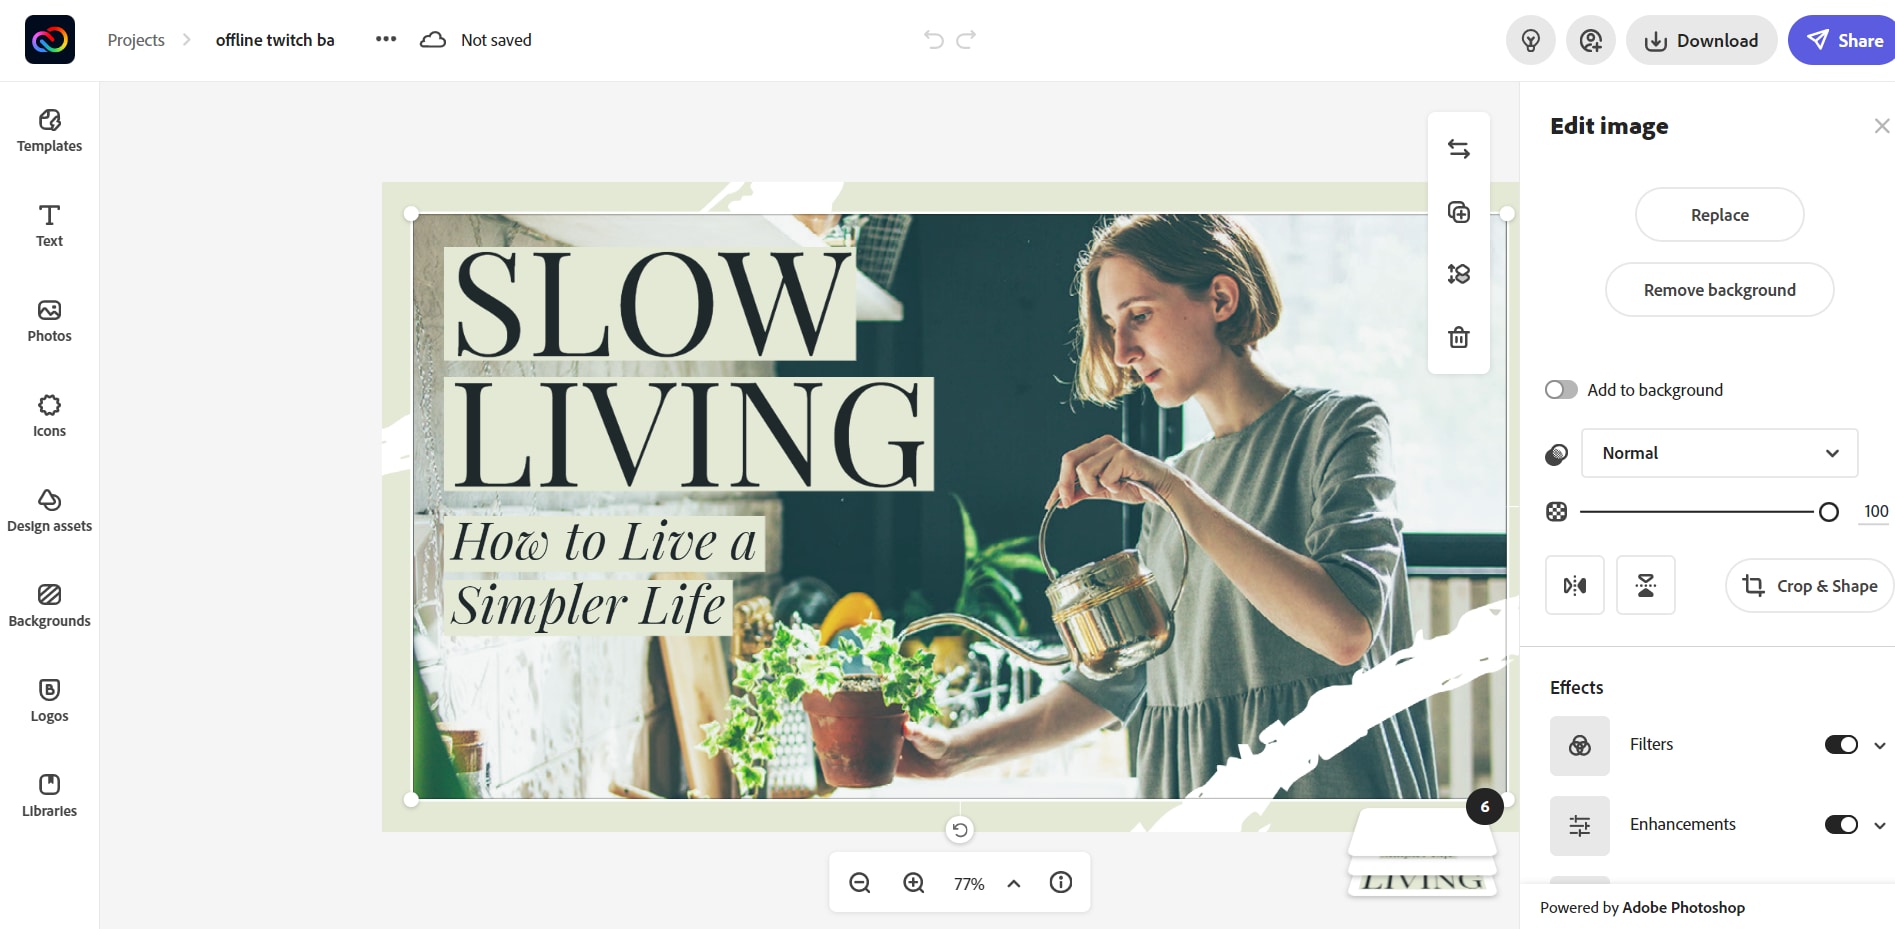
These options include replacing the image, adding enhancements, cutting and trimming and adding various kinds of filters to your image.
Step 5. Download your YouTube banner
Once you have edited the text and image to your requirement, you can download the final project by clicking the download option on the top right of your main window.
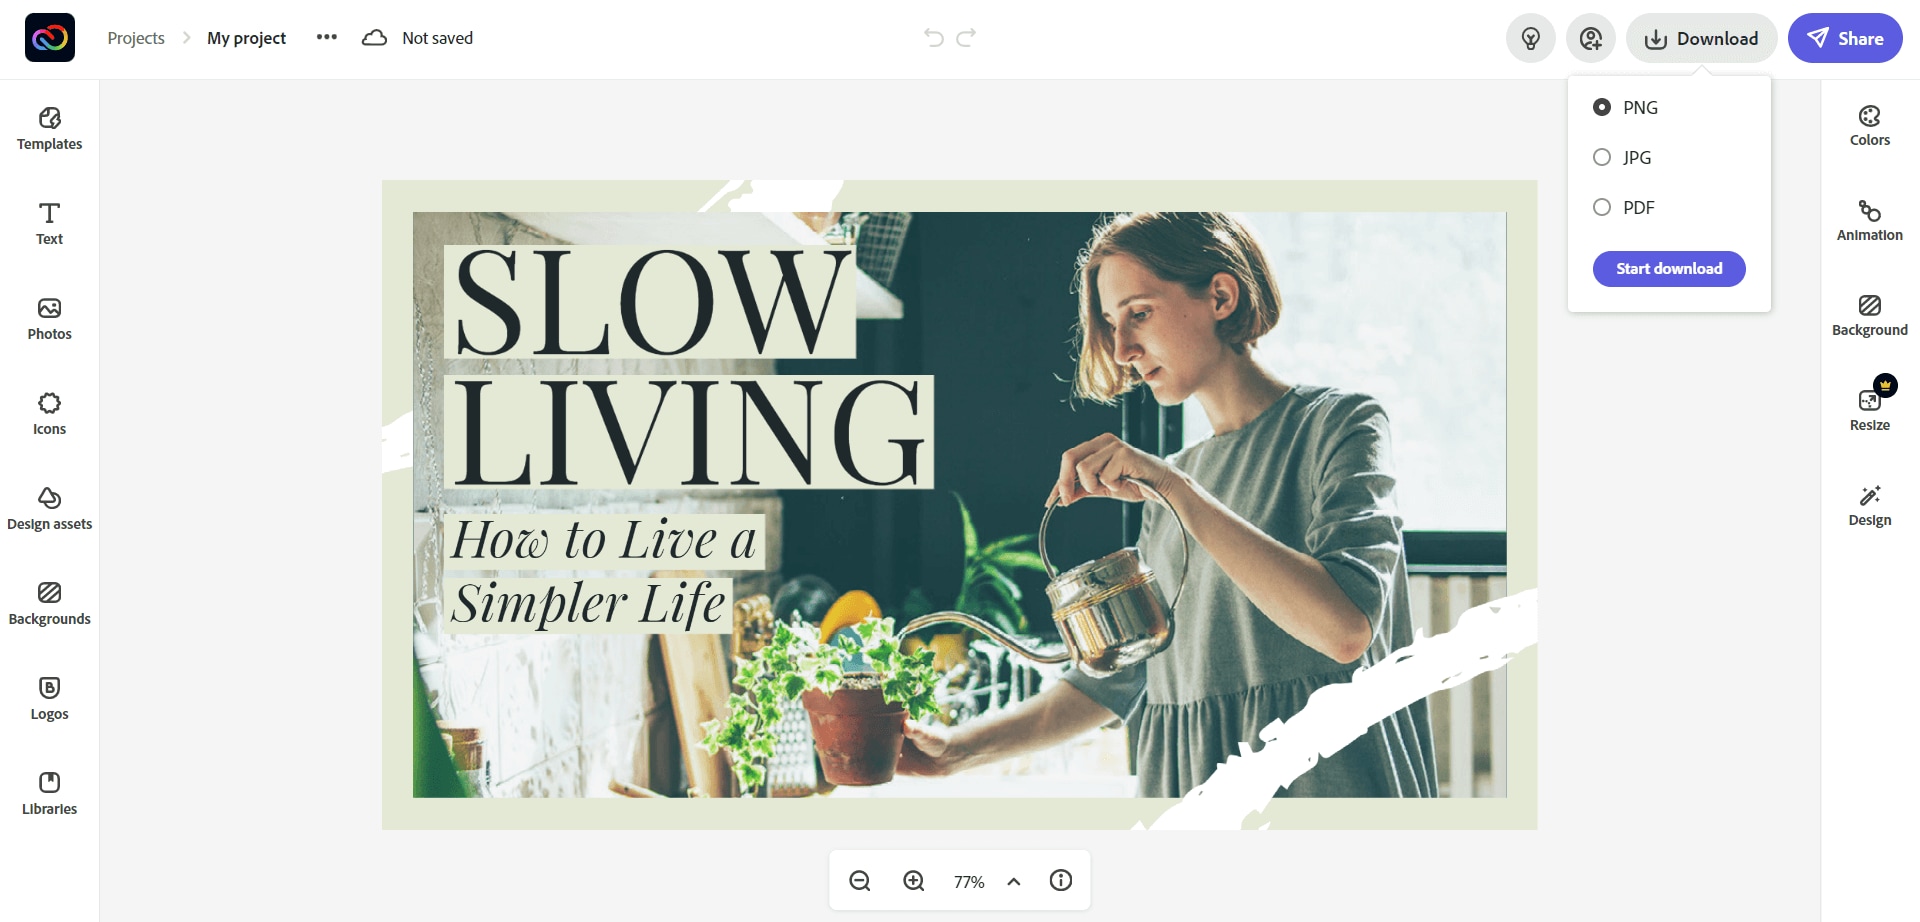
You can save your image as in the PNG, PDF and JPG file formats.
Part 4. Keep these Guidelines in Your Mind before Starting
Before beginning to create a Youtube Banner, users should keep the following guidelines in mind.
1. Using the correct size:
YouTube banner background should be 21:9 ratios and width should be 1920 pixels, and height is 1080 pixels with an aspect ratio of 1.77:1.
2. A clean, simple design:
The banner shouldn't have too much information, or it might look unorganized, so keep it clean and simple. A few primary sections will be enough to make a recognizable banner.
3. Maximize your engagement:
The banner should look like it belongs on the channel, so everyday things you might see are similar colors used in the banners or logos of the channels with some abstract creative design if needed to make it unique.
4. Being legal:
Your banner should not have features that disable the use of any other content from being used. For example, it could include the logo of a publisher or music that is already copyrighted, and you would need to get permission from them before using their work, which will probably cost you money./
5. Some examples of other banner:
You should find a few other banners on the channel pages that will give you ideas or inspiration as to how to make your banner.


