


Adobe is one of the industry leaders in image processing software and perhaps one of the best programs for editing. It features countless processes and functions and is the go-to software for photographers nowadays.
Adobe Lightroom may seem to be a little overwhelming in the beginning, but it is actually relatively easy to use. Fret not, though. We aim to provide you with a complete guide on what Lightroom is and how you can use it on desktop and mobile. So, let's get to it.
Part 1. Basic Understanding of Adobe Lightroom
Without further ado, let's get acquainted with Adobe Lightroom.
What Is Lightroom?
Lightroom can be seen as photo editing and photo organization software. Lightroom not only allows you to sort your photos, but it also gives you powerful editing options. Once you're done editing, processing, and organizing you can export these photos in any size you need.
Being one of the Adobe Creative Cloud apps, Lightroom is used by beginners to expert photographers for image editing. Lightroom allows you to edit on your desktop or mobile as per your need.
Lightroom also serves to be a RAW converter and is compatible with NEF and CR2 formats which are RAW file types of Nikon and Canon. The latest version of Lightroom also gives you the option to create books from your photographs. Not just that, but you can also create a virtual map for geotagging images.
Why Should I Choose Lightroom?
There are several reasons why Lightroom can prove to be a great choice for you. It provides a number of benefits over other editing tools, some of which are listed below.
- Image Viewing
As explained above, Lightroom allows you to convert RAW format files into images that you can see. The ease that Lightroom provides in this matter is that it can batch-convert these photos, which makes it significantly easier to convert a large number of photos.
- Image Organization
Lightroom allows you to organize the files properly right from the start, consequently saving you significant effort and time later down the line. Not just that, but you can create albums for the images and files can be moved to different locations on the hard drive.
- Non-Destructive Editing
This feature means that Lightroom doesn't save over the original image with an edited image. As a result, you're able to create many separate edits of an image without affecting the original one. If at any point you wish to start over or start from a specific point during the editing, you will have the option to revert back to the original image.
- Detail Control
Lightroom offers the ability to focus on the finer details of the image and make it look tidier. Other than that, Lightroom can also be used to shift focus in your images by applying blur effects or global sharpening. Plus, you can make selective edits by selecting an area of the image and intensifying the shadows around the subject.
- Composition Control
Lightroom provides you with the option to easily crop the images within the app. This means that any part of the image that is not of interest to you can be removed easily. Additionally, you can also straighten the images within the app to perfectly align the horizons of the image with the edges.
- Color and Light Control
Whether you want to change the saturation or the contrast of an image, Lightroom gives you easy-to-use sliders to do both. This not only makes the process easier and smoother, but also much faster. From altering image tone using tone curves to applying light filters, Lightroom gives you many advanced options in light and color control.
Part 2. How to Use Adobe Lightroom for Desktop?
Adobe has optimized Lightroom in such a way that you can use it with desktop easily. So, let's dive into that.
How to Get Started With Adobe Lightroom for Desktop?
To start off, you need to download the Lightroom application on your desktop. Once done, follow the steps listed below to edit and save your photos.
Phase 1: Importing the Photos
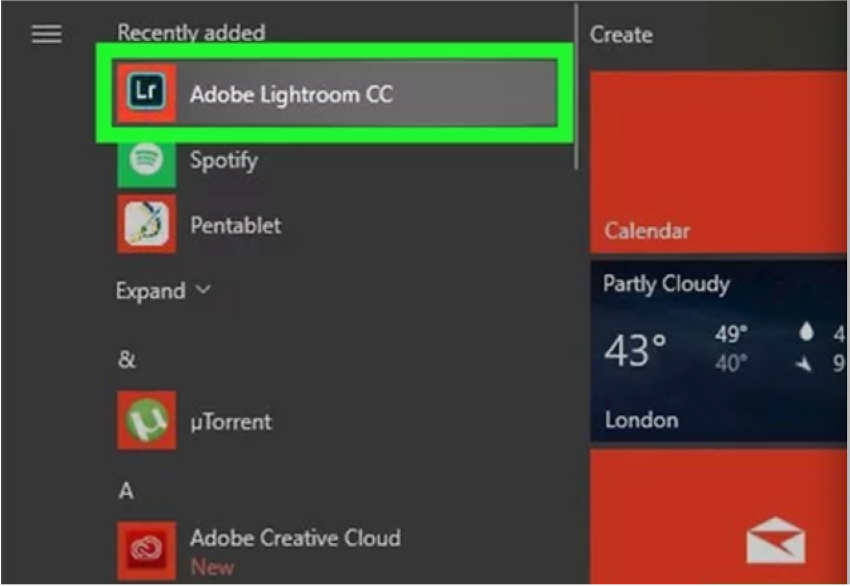
- Firstly, you need to locate and launch Lightroom. It can be found in the All Apps area of the Start Menu in Windows and the Applications folder in the macOS.
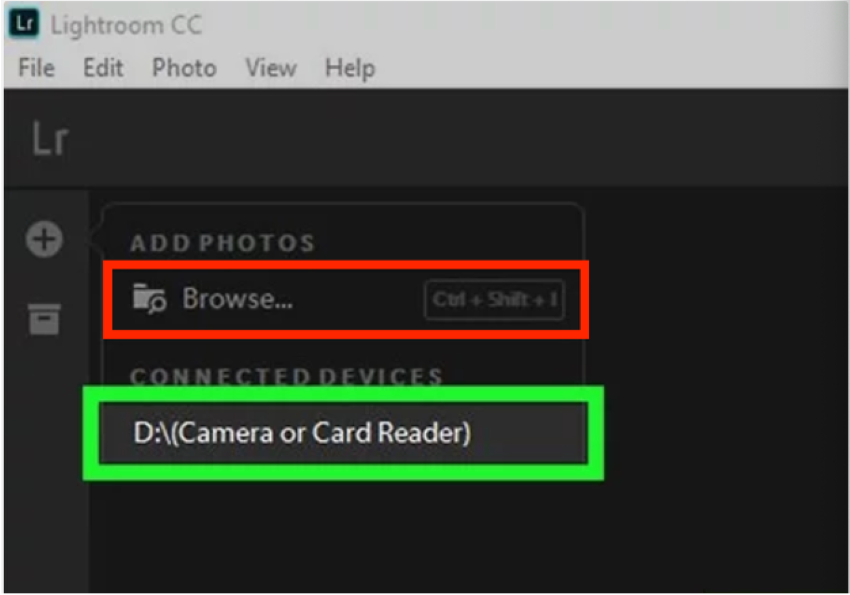
- When you launch the application, click the + icon in the top-left corner. If you have connected an external drive or your camera's SD card, select that among the connected devices. Otherwise, click Browse to open the computer's file browser.
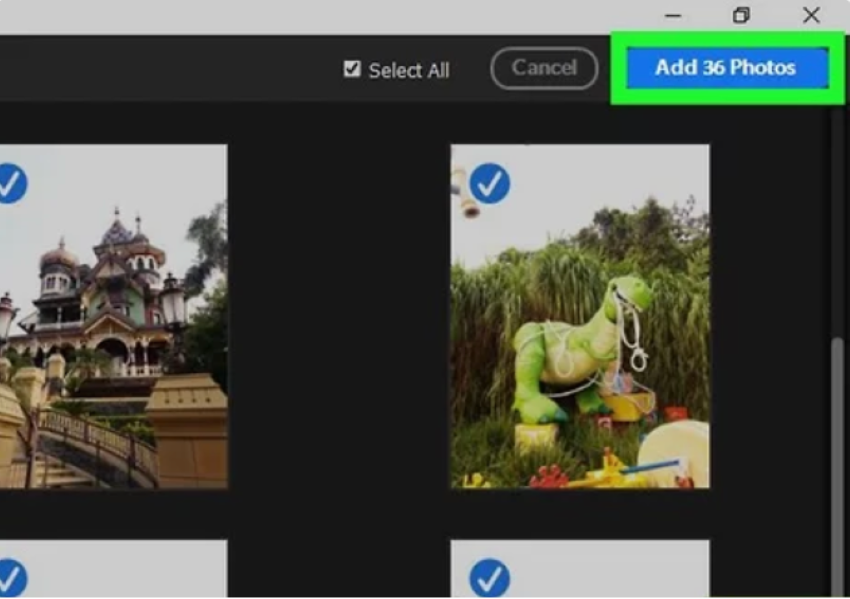
- Now all the photos in the folder you selected will be displayed. You can select the ones you want to add and then click Add Photos to add them to Lightroom. Keep in mind that you have the option to add multiple photos at the same time.
Phase 2: Editing The Photos
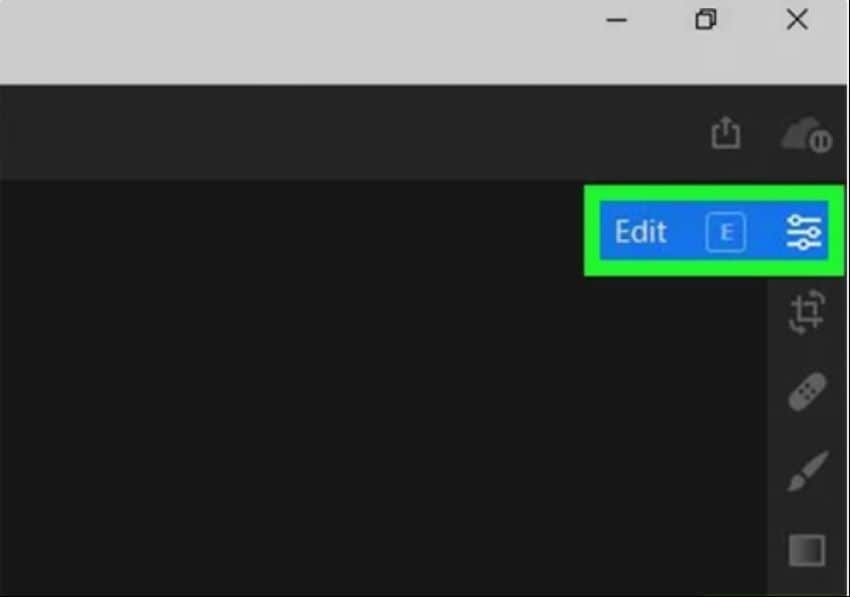
- Once you have added the photos to your Lightroom library, it's time to edit them. Click on any photo that you wish to edit, it will open a larger version of the photo.

- You will notice an Edit button in the column that runs on the right side of the screen. You can go to the editing mode by pressing E on your keyboard.
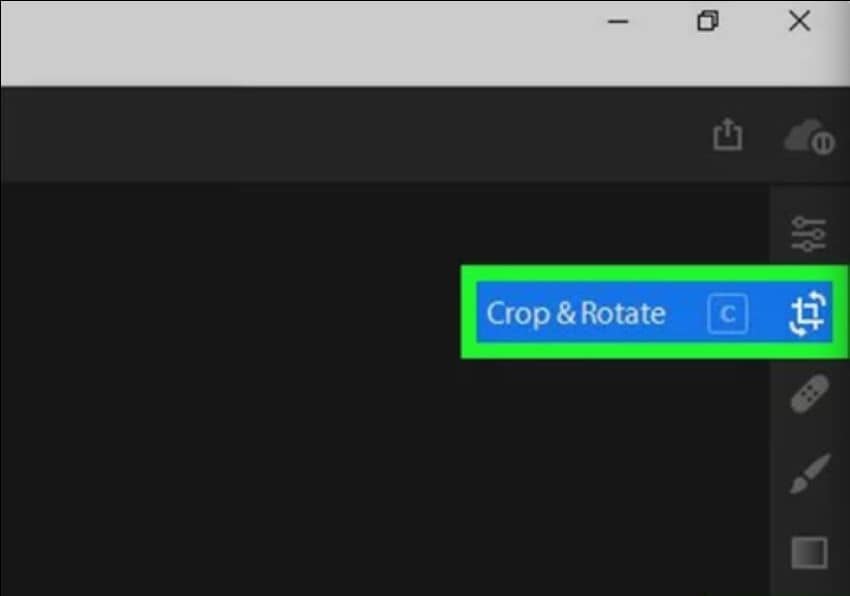
- If you wish to crop or rotate the image, you can click the Crop button that is present below the Edit button. Or you can also press C on your keyboard.
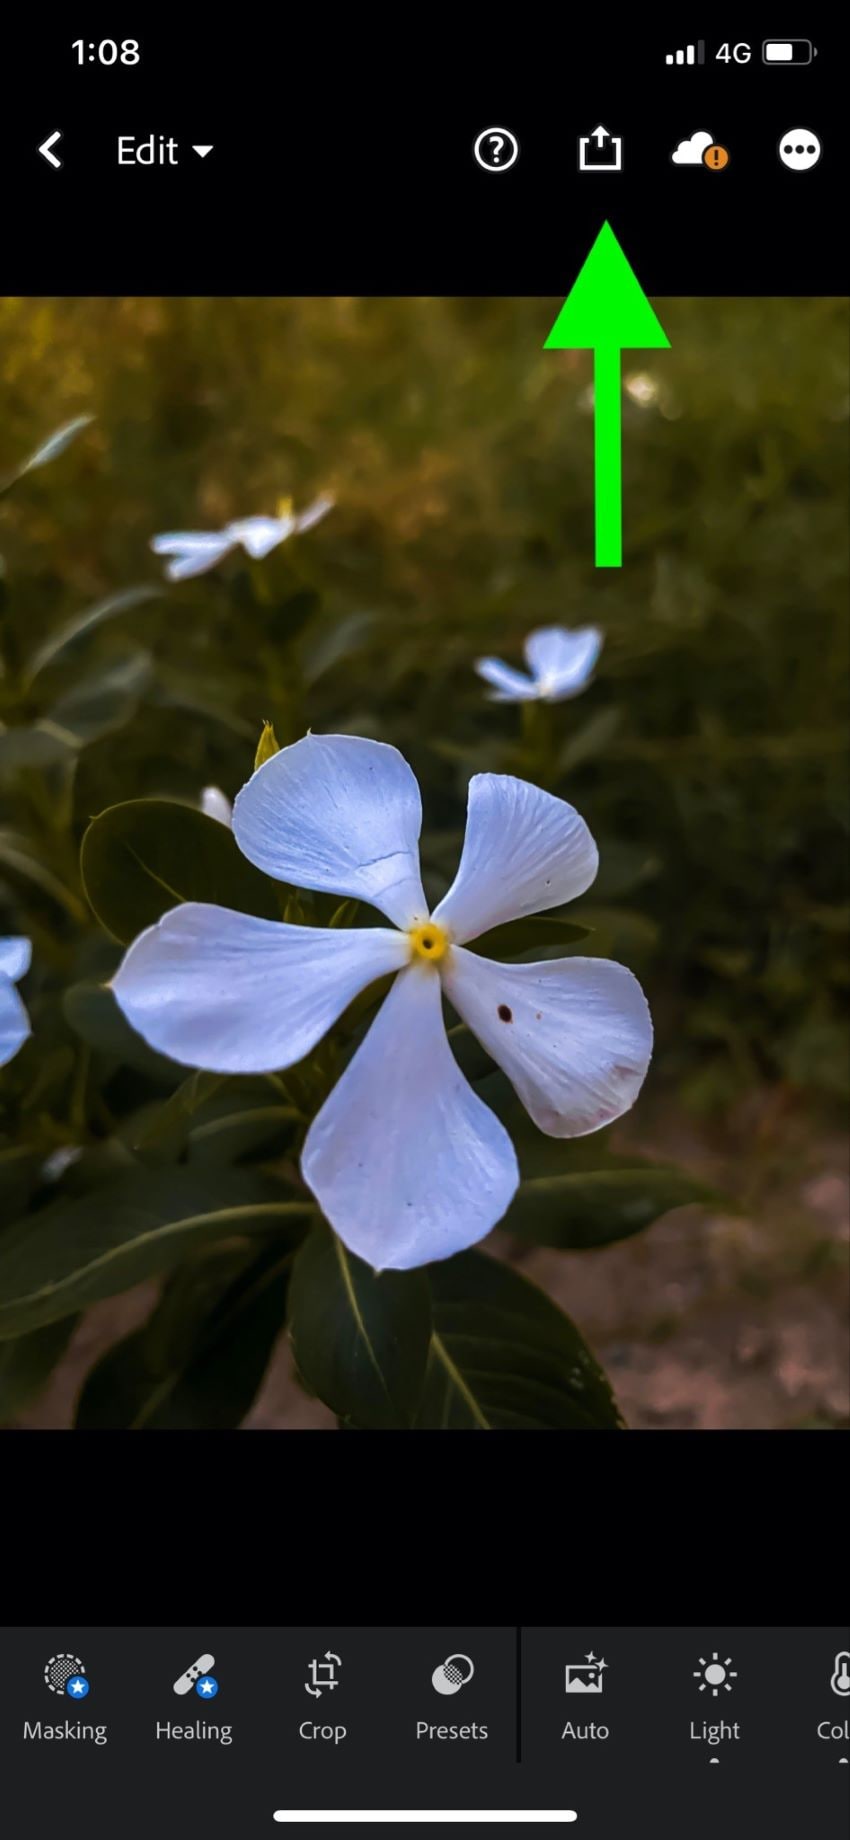
Moving forward, you can click Presets tab, which is present at the top right panel.
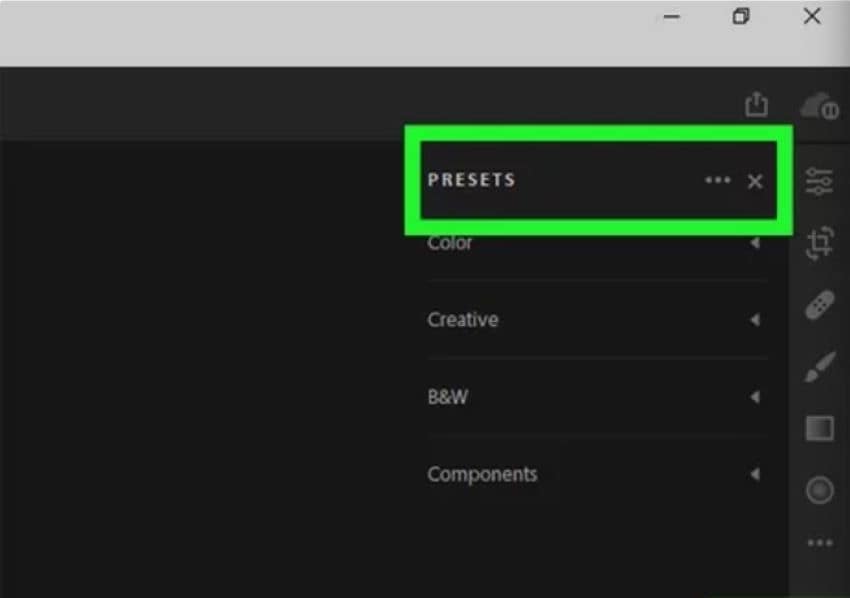
- This tab has Lightroom Presets broken down into groups like Color, Black and White, Creative, etc. Click the arrow present next to each group in the right panel to see its contents.
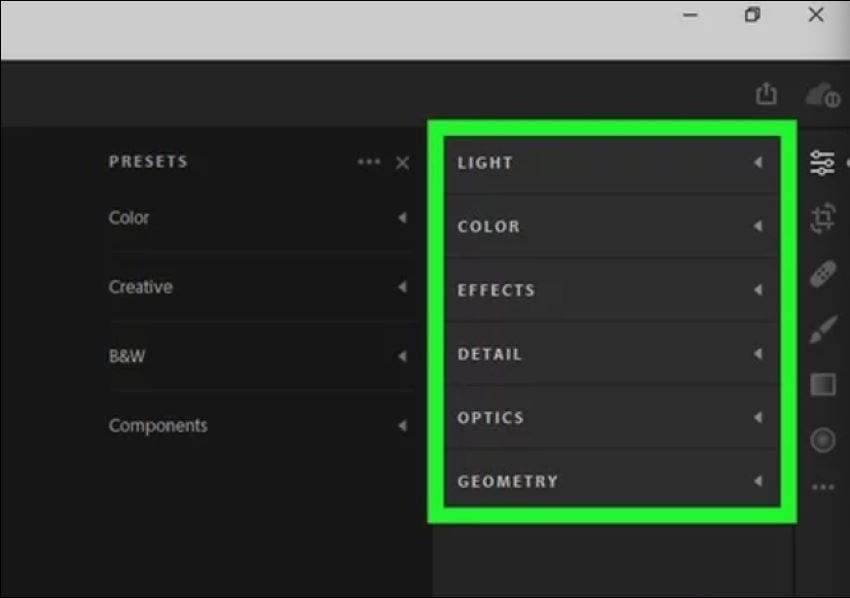
If you wish to manually adjust your photo and change light, color, effects, details, etc., click Adjust button. Then you need to click the Adjust tab, which is right next to the Presets tab.
Phase 3: Saving and Exporting Them
- When you're done editing the photo, click on the File menu that is present in the top-left corner of the screen.
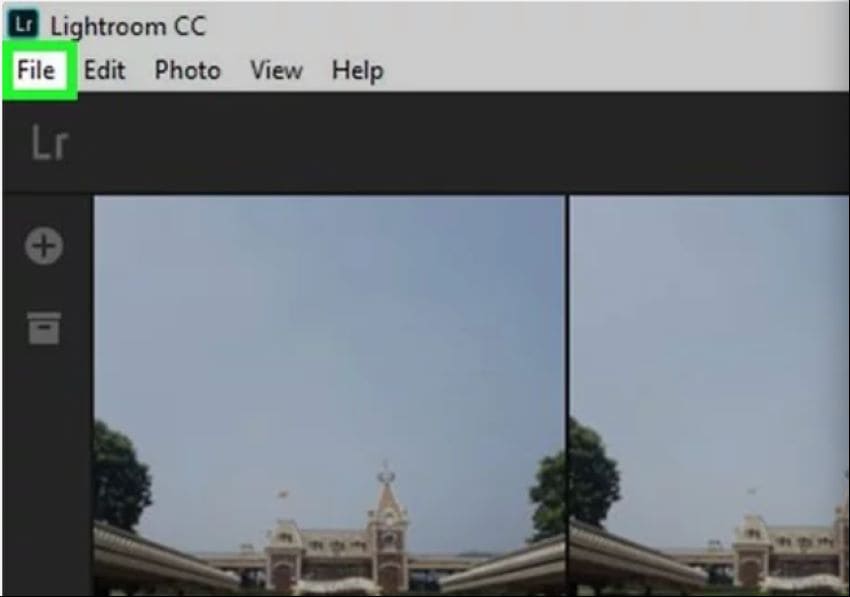
- Click the File menu. You will see a dropdown from where you are supposed to select the option that says, "Save To…".
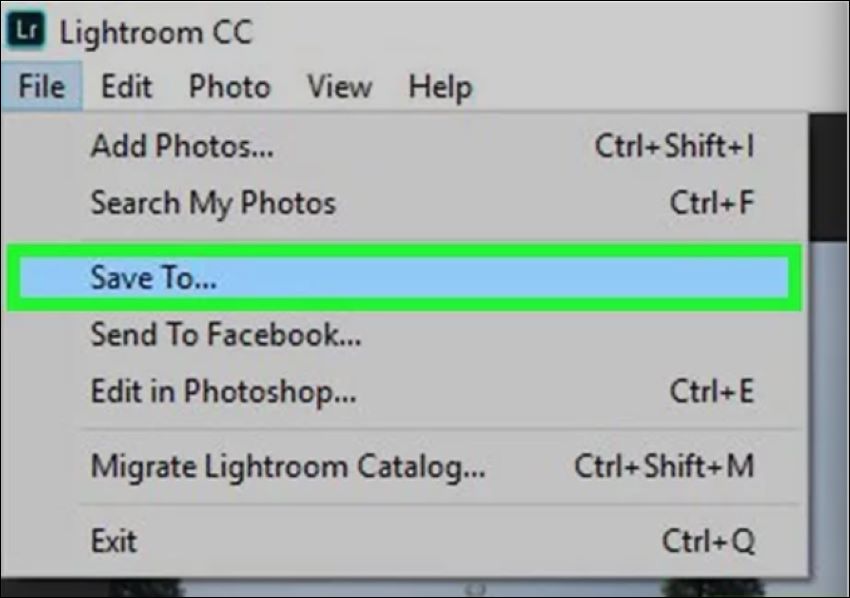
- Now, a pop-up will appear, and you will be required to select the File Type, Location, and Size of the image.

- Once you've selected the File Type, Location, and Size of the image, click the Save button to save it.
3 Methods to Edit Photos in Adobe Lightroom for Desktop?
Being a powerful editing tool, Adobe Lightroom provides its users with a significant number of methods for editing photos.
Manual Editing
To start off, you can perform manual editing for which the method has been listed above. In manual editing, you will have multiple editing options. This includes adjusting the highlights, exposure, shadows, contrast, tint, saturation, etc.
Additionally, you can add details and improve the image quality by adjusting the sliders under Split Toning and Effects.
Using Presets
Presets serve to be a great addition to your workflow as they develop your style of photography and save you hours of work. It is also essential to know that you can download and use presets made by other people too. Professional photographers tend to have their own custom presets that they apply to their work.
Creating New Preset
Customizing a preset of your own in Lightroom is no doubt another spotlight feature that this app offers. Below are the steps that you need to follow for creating a preset on Lightroom.
- Launch the Lightroom app and head over to the Develop module.
- Click the + button that is present next to the Presets on the left-hand side.
- Select the "Create Preset" option.
- Check the options you want for preset.
- Rename the Preset and give it a name of your choice and then press the Create button.
In case you're wondering how to export Lightroom mobile presets to desktop, you don't have to because they will automatically be synced on both devices if you're logged into the same account.
Part 3. How To Use Adobe Lightroom for Mobile?
Adobe Lightroom for mobile is as powerful as it is for desktop. Let's get to know which devices support Lightroom and how you can get started with it on your device.
Which Devices Are Supported By Adobe Lightroom For Mobile?
Adobe Lightroom can be downloaded on both iPhone and Android, and in case you're wondering, Lightroom for mobile is free to download and use.
However, it is essential to know that you need to have an Adobe Creative Cloud account to access all the features of Lightroom mobile.
How to Get Started With Adobe Lightroom for Mobile?
First off, download the application from App Store or Play Store. Once done, launch the app and follow the steps listed below to edit and save your images.
Phase 1: Signing In
- When you launch the application, you will be prompted to sign in. Keep in mind to sign in with your paid Adobe Creative Account. However, if you don’t have a paid account, you won’t be able to access the paid features, but you can still sign in and use the app.

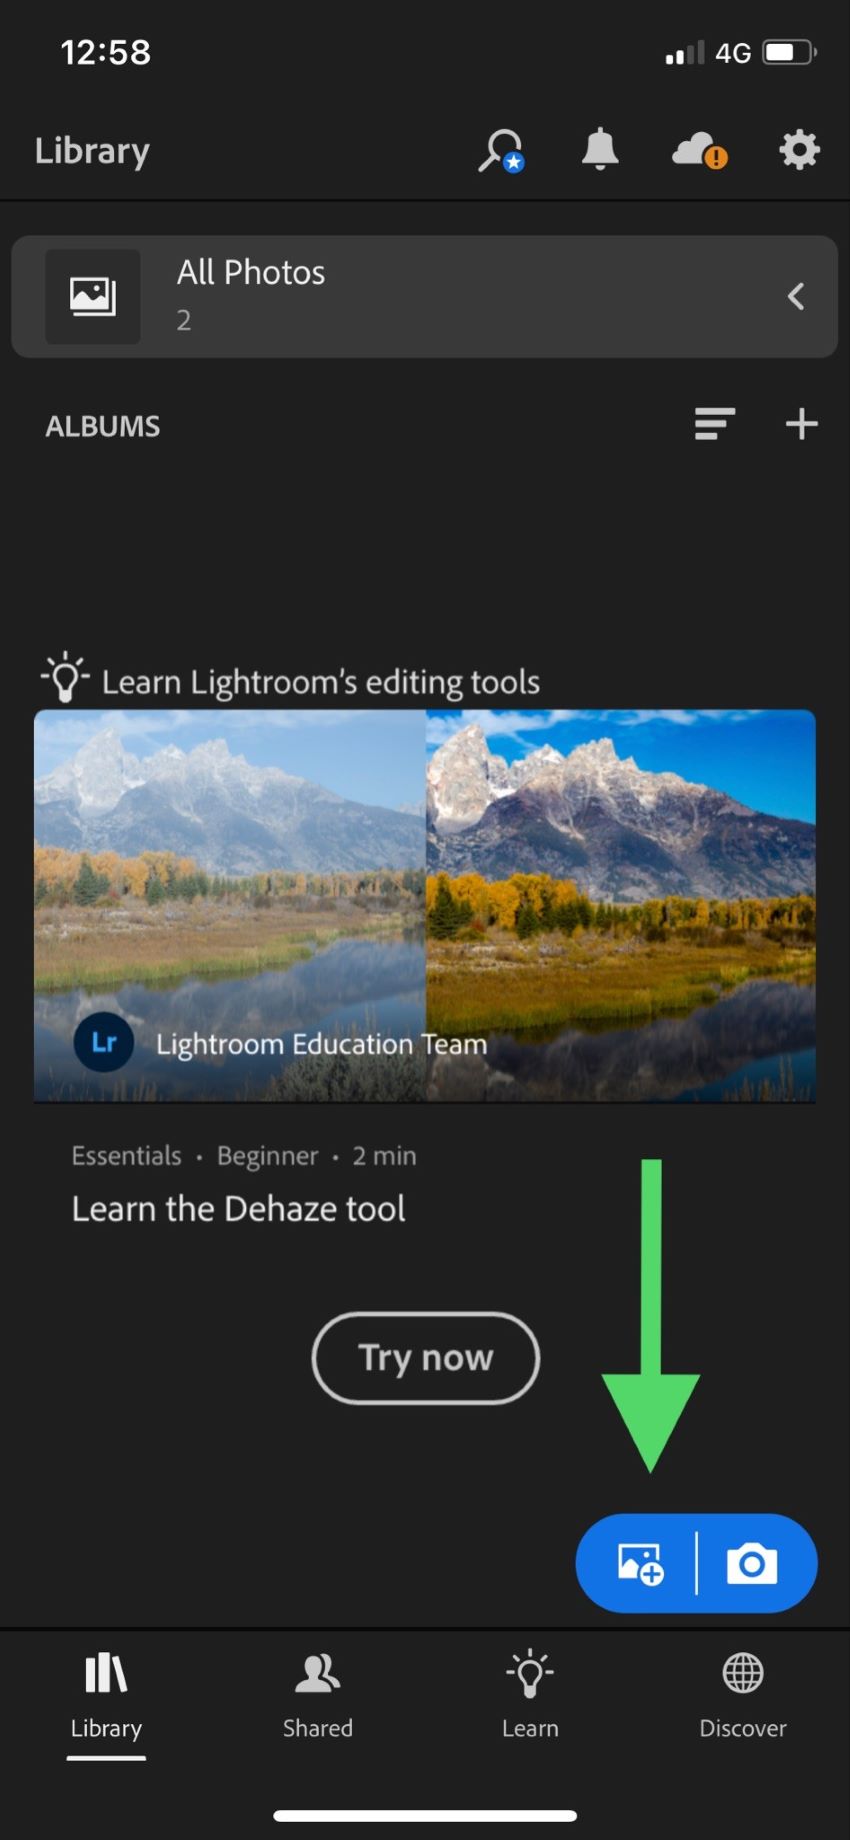
Phase 2: Import the Photos
- You can import photos from your camera roll by tapping on this icon and then choosing “From Camera Roll.” However, if you wish to capture a photo with Lightroom and edit it right away, you can tap on the camera icon next to this icon.
- If you choose the camera option, you can make several adjustments while capturing the image as well. These include adjusting the aspect ratio, shutter delay, and file format too.
Phase 3: Editing
- Once you have imported the image, it will be shown in the default All Photos library of Lightroom. Tap on the image to put it in editing mode. Once it is enlarged, you will notice a sliding bar at the bottom of the screen from where you can make adjustments to different settings.
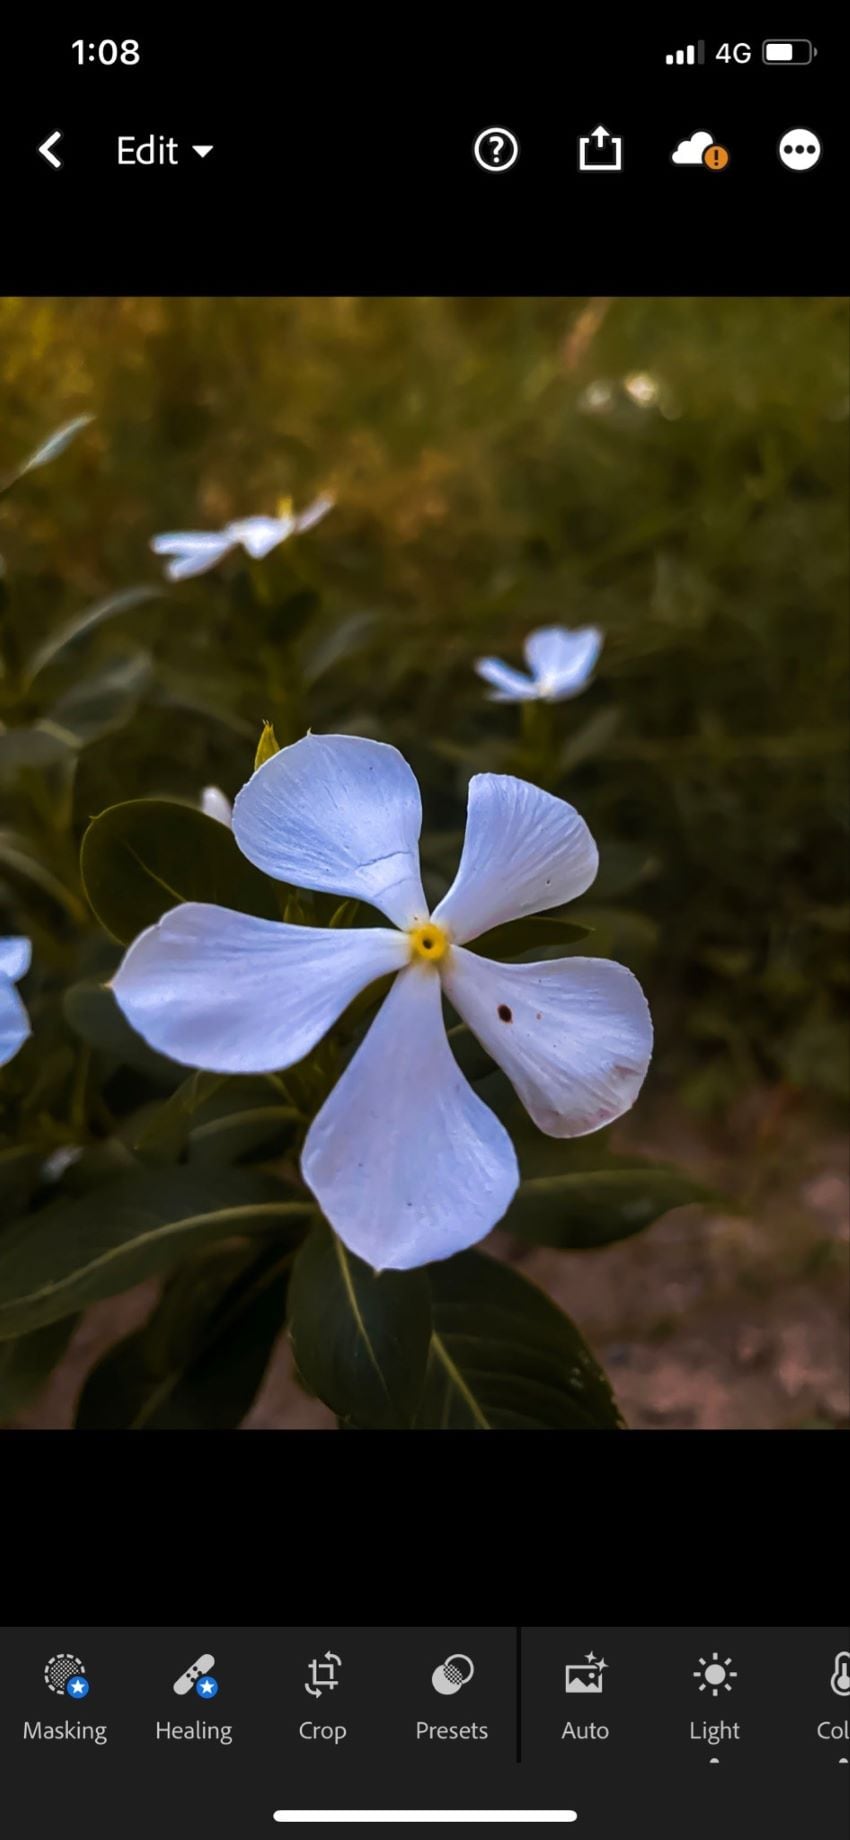
- You can tap on the Auto option to allow Lightroom to do its magic, or you can use your own skills to adjust Light, Color, and various other things.
- Just like on the desktop, you also have the option to apply presets to any image here.
- After editing is done, you can long press on an image to see the original one too.
Phase 4: Export, Save, or Share
- When you’re done editing the photo, tap on this option and you'll be displayed many options to share or save the edited photo. Choose the option you deem right.
- Keep in mind that you can either save the photo to the camera roll or share it directly to social media platforms like WhatsApp, Instagram, Facebook, etc.
- If you wish to know how to export dng from lightroom mobile, the method is the same.
FAQs about Lightroom Presets
1. Do Lightroom For Mobile Presets Work On A Desktop?
Adobe offers a great cloud-based system and allows you to use Mobile Presets on a desktop and vice versa. However, you need to have a paid subscription to Adobe Lightroom, and you need to be signed into the same account on both devices. Otherwise, there won't be any other method to export preset lightroom mobile.
2. What File Formats Can Lightroom For Mobile Import and Export?
Lightroom is a powerful app, and it tends to support a number of file formats. Here is the list of formats that are supported by Lightroom.
- RAW
- DNG
- HEIF/HEIC
- TIFF
- JPEG
- PSD
- PSBF
- PNG
3. Can I Make Videos With Presets Too?
Yes, Lightroom does allow you to edit videos and add presets to them. However, it isn't primarily designed for video editing. So, in case you're looking for a video editing software as powerful as Lightroom, you should look up Filmora.
Filmora happens to be a great video editing tool that offers an intuitive design and is free to use as well.
While Lightroom does have great presets for photos, Filmora is specialized in video presets and offers more than 400 presets. The benefits of Filmora aren’t just limited to this, as the Filmora development team continuously updates the application, making it adapt to the latest editing tools and features.
So, if you're thinking about how you can get started with Filmora, here is a guide that may help you out.
https://www.iskysoft.com/filmora-video-editor-windows-guide/
Conclusion
All in all, Adobe Lightroom is a highly capable and powerful app that can help put life in all of the photos. This is why it is preferred by all the newbies and professional photographers out there. However, Lightroom isn't really the best choice when it comes to video editing, so for that, you can refer to Filmora.
Recommendation: Filmora Video Editor
- Best video editing software for beginner and semi-professional, that comes with powerful editing skills like trimming, splitting, rotating, editing, etc.
- Advanced video effects like green screen, PIP, audio mixer, etc. can also be found and applied to your video within few clicks.
- 500+ free special video effects to customize and create an awesome movie by yourself.
- 1000+ standalone effects downloading resources to make videos in all kinds of styles.
- Export videos to Chromebooks compatible format with 1 simple click.


