


Using presentations as a visual aid while presenting your ideas and tutorials goes a long way in giving your presentation a flawless delivery. Apart from clearly expressing your ideas, it is necessary to learn how to record PowerPoint presentations with Webcam (i.e., simultaneously recording yourself and your screen) as this will boost your viewers' engagement.
In this post, we'll look at two methods to record PowerPoint presentations with webcam: first, using the built-in recording tool; then, a powerful third-party video editing software.
- Method 1. Record with PowerPoint >
- Method 2. Record PowerPoint Presentation with Webcam Using Filmora Video Editor (Best choice!) >
Part 1: Record with PowerPoint
PowerPoint has built-in tools and functions for screen recording and narration using a camera/webcam input stream: this is an advanced function coming from Office365 that could easily give a polished and professional feel to presentations, yet it goes unnoticed by most PowerPoint users.
How to capture slides screen and webcam video simultaneously on PowerPoint?
- Step 1. Go to the "Slide Show" tab and select "Record Slide Show". You'll find two options: "Record from Current Slide", and "Record from Beginning".
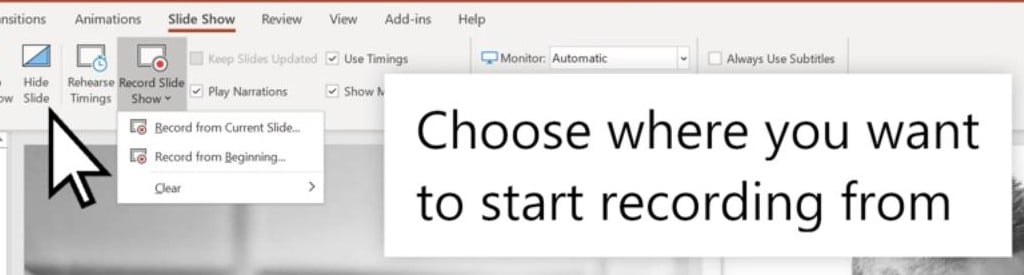
- Step 2. Start recording. Choose the "Record from Beginning" option, click the red "Record" button, and start speaking into your microphone. If you want to record a specific slide, you'll need to first go to the slide in question and select "Record" again.

At the bottom end of the current interface, you'll find a color palette for customizing how your mouse pointer appears on the screen: choose a suitable color depending on the color scheme of your slide.
Remember to play first before speaking when a slide transition occurs as narration won't continue to record in such a situation, which can be annoying to most users. However, there's no way around: unless, of course, a reliable third-party software.
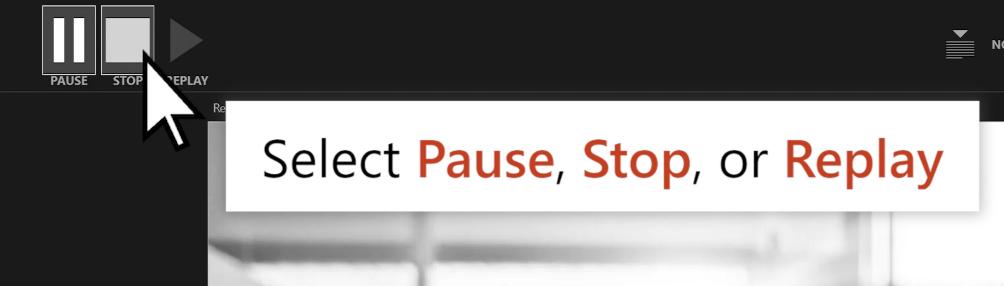
- Step 3. Pause, Replay, or Stop recording when done.
How to record a section of your screen on PowerPoint?
- Select Screen Recording. From the "Insert" tab, select "Screen Recording" from the menu.
- Choose the area for recording. To record a specific area of your screen, use the "Select Area" option.
- Start recording. Click "Record" to start recording your screen after selecting the area.
- Use the pause button to pause; hit stop, the button with the timer below it to stop recording. Select "Audio" or "Record Pointer" if you want to record with sound/show mouse position, respectively.
- Save your presentation from "File" > "Save".
The "Record Slide Show" feature is limited to specific versions of PowerPoint/Office365, so do not fret if you don't find the option on your PowerPoint. If you're sure the "Record Slide Show" isn't available on your current version, do well to update the software or use alternative software such as Filmora Video Editor.
Method 2: Record PowerPoint Presentation with Webcam Using Filmora Video Editor (Best Choice!)
Filmora Video Editor is the recommended tool for recording PowerPoint Presentation as it allows recording webcam and voice simultaneously. Generally, it enables you to record any screen while simultaneously (also optionally) recording from a built-in/external webcam. Filmora video editor is recommended due to its flexible recording style on Windows and Mac.

Best Program to Record PowerPoint Presentation with Webcam
- Multiple interfaces and recording styles.
- Adjustable screen and Webcam recording quality.
- Supports picture-in-picture mode.
- Records voice from speakers.
- Advanced video editing for finishing touches.
How to Record a PowerPoint with a Webcam Using Filmora?
-Step 1. Open the screen recording interface on Filmora.
Launch Filmora video editor on your device, switch to the "Media" tab; open the "Record" drop-down to display the various recording options.
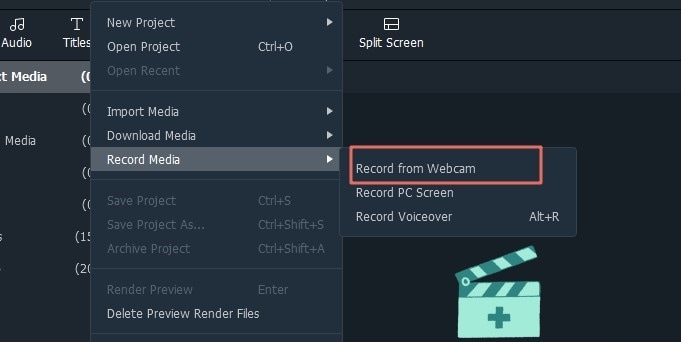
-Step 2. Adjust recording settings.
Select your preferred option: whether you'll be recording from your device's built-in webcam or an external one. You can also capture your computer's screen while simultaneously using the Webcam and audio input devices. Click the "Record Screen" option: Filmora's screen control window will pop up soon after that.
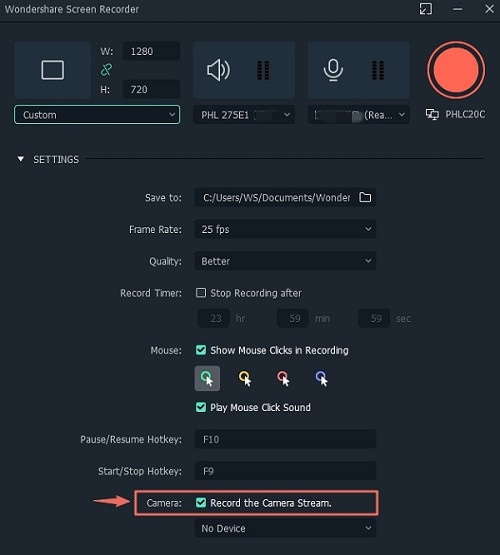
You can choose where you'll want your output video, among other options, by clicking the settings drop-down/icon to the right.
Whether you'll be needing the "Show Mouse Clicks in Recording" option depends on the nature of your video: tutorial clips typically show mouse position and clicks as it gives your audience a better idea of what's going on on your PowerPoint.
"Pause/Resume Hotkey" set to the spacebar on your keyboard by default is responsible for pausing/resuming your screen session. F9 starts/stops the session.
Last but not least, remember to tick the "Record the Camera Stream" before hitting the giant red record button.
-Step 3. Proceed to PowerPoint.
Open your PowerPoint presentation, hit "F9" on your keyboard to initiate the screen and Webcam recording session, and go about your business as usual.
Now, don't forget that Filmora is a full-fledged video editing tool! You can fine-tune your video to give it a professional look by adding all sorts of titles, effects, transitions, templates, and other elements and items. The tabs for adding transitions, elements, overlays, titles, etc., are neatly arranged at the upper part of Filmora's main window for easy access. Do with them as you please.
Conclusion
Recording your PowerPoint Presentation alongside Webcam no doubt gives your presentation a better delivery. In a world where it's increasingly difficult to sustain the attention of audiences, recording presentations with Webcam becomes a necessity. We've seen how to achieve this using PowerPoint's built-in tools and a well-rounded third-party tool, Filmora Video Editor.
Filmora is a highly recommended software as it goes beyond the limits of the built-in recording tool in PowerPoint. It is an advanced tool, but quite easy to use. You could follow the steps outlined in this tutorial to achieve your purpose of outputting the desired video.


